Digital Multimeter Troubleshooting and Repair
Your digital multimeter should last for a number of years with reasonable care. There may come a time when your multimeter malfunctions, and you’ll have to decide whether to repair it or buy a new one. Before going out and looking for a new multimeter, you should use the Digital Multimeter Troubleshooting and Repair as the final effort to save your meter. The EPA estimates that, in 2009, US consumers and businesses discarded televisions, computers, cell phones, and hard copy peripherals (including printers, scanners, faxes) totaling 2.37 million tons.
The first step of troubleshooting is to check the battery and, try to power on your digital multimeter.
- If the multimeter doesn’t turn on or the display is dim you may have a weak or dead battery. Simply replace the battery and you should be good to go.
- If your multimeter powers up but you aren’t getting accurate measurements you may have faulty test leads. Set your multimeter to read resistance and touch the test probe leads together. It should read zero ohms.
- If you have resistance ratings of over one ohm or the reading is erratic, you should be able to fix the problem by replacing the probe leads.
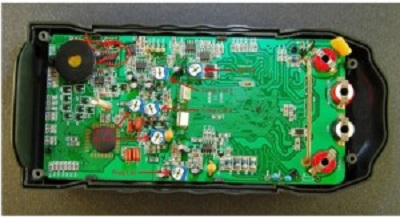
- If you still haven’t been able to address the issue the next step is to disassemble your digital multimeter. Use a small screwdriver to remove the screws holding the case together.
Second, let check the fuse, since you’ve opened the multimeter locate the fuse and remove it.
- If it’s a clear glass fuse inspect the inside to see if the thin wire within is burned out.
- If it’s blown, replace it.
- If it’s a ceramic fuse you’ll have to check its resistance with another multimeter.
- If there is no resistance, you’ll need to replace it. (Consult your multimeter’s manual to find out which fuse you need.)
Finally, for wires and other connections that may be corroded or broken.
- If you do find a damaged connection desolder it with a soldering iron and wick and resolder it.
- Check for loose parts or screws inside the multimeter’s case and fix them in the appropriate way.
Reassemble your digital multimeter, set it to measure resistance, and touch the probe leads together. It should read well under one ohm. The Digital Multimeter Troubleshooting and Repair is a basic repair process. If the multimeter is still malfunctioning, it may be time to replace it.
I connected multimeter to 230V ac , keeping the selecter at 200 ohm resistance by mistake. A small spark came and now multimeter is not able to read DC voltage (except with 1000V selection) . All other parameters are working fine. Where will be the problem? How can I repair it?
Buy a new fuse