DIY: Smartphone Garage Opener w/ Status Updates
DIY: Smartphone Garage Opener w/ Status Updates
The Internet of Things, or IoT, is one of the biggest buzz words in new technology today. Although IoT technologies are growing fast, most commercially available systems are still too expensive for the average consumer. For example, a Nest thermostat will costs upwards of $200, and a robust Wifi garage door opener will run you a solid $130.
As of 2015, estimates indicate there were about 3 million smart thermostats in US households, which makes up less than 3% of households. In order to make IoT more accessible, a number of DIYers have developed simple applications for connected devices.
In this blog post we are going to show you our original approach to building a simple, versatile, Particle Photon powered smartphone garage door opener – Complete with status updates (Open/Closed) using free web-based cloud services that can trigger a text or email if the garage is opened (or if the garage is left open for an extended period of time).
We would rate this DIY project as ‘medium’ with some electronics & coding experience needed. To make things simple, we’ve put together an IoT wifi garage opener kit to get you started.
What you’ll need to complete this project:
1 – Particle Photon ($19)
2 – 20 ft. 22 AWG solid wire ($2)
1 – Jumper Wire Kit ($4)
1 – Medium Sized Breadboard ($4)
1 – Relay R46-5D12-6 ($5)
1 – Reed Switch & Magnet ($5)
1 – 5V Micro USB Cable & Wall Adapter ($4)
or – 5V Wall Power Supply ($9)
1 – NPN transistor – 2N2222A ($1.70)
1 – 100 Ohm 1/4 Watt Resistor – RA100 ($0.10)
1- 220 Ohm 1/4 Watt Resistor – RA220 (RA220)
2 LED’S – ($1.65 for 100 pc.)
Various Mounting Hardware, Depending on application (screws/nails/electrical tape) ($1)
The software and applications you’ll use for this project are:
• Particle (iOS or Android App) for entering your home Wifi credentials on the Particle Photon Wifi controller
• Build.particle.io – web based software interface for the Particle Photon for loading software
• Blynk (iOS or Android App) – smart phone app with GUI interface for opening/closing garage
• IFTTT – web based service for triggering text/email status notifications
Step 1: Wifi Controlled Garage Opener via Phone App
Begin by unpacking and getting familiar with all your items. First you’ll need to install the Particle & Blink apps on your smartphone. Once these are installed you should power up your Particle Photon by plugging it into your computer’s USB or the wall with your USB adapter. Once powered on you can create an account with Particle and connect to it using their very handy setup guide.
Once you’ve connected to your Particle Photon you can go to Particle’s cloud based programming platform and log into your Particle account.
Click on the CREATE NEW APP button on the left hand side (you may have to click the to expand that column) then copy paste the code from the text file here PhotonGarageOpener
This program was set up to send a text notifying the user if the garage was left open for ten minutes, and to send a text every ten minutes following.
Name your app Garage and save it. You will need to also add the Blynk library to your program by clicking the bookmark symbol on the left for Libraries, select the Blynk library, click INCLUDE IN APP and select your app named Garage from the list. Save your program.
Next open your Blynk App, create an account, and click Create New Project, name it Garage. Once this is created email the auth key to yourself and replace the auth code with the text on line 5 of the Particle code where it says ENTER YOUR BLYNK AUTH CODE HERE, keeping the quotation marks. Flash the code to your Particle Photon by clicking the lightning bolt, it should now flash purple slowly.
Return to your Blynk App (which you can download from the Apple App store or Google Play). Select hardware “Particle Photon” and click “Create Project”. Select anywhere on the screen and it will bring up available GUI buttons, sliders etc.
Select “Button”. Once it appears on the screen on the top left select it to open it for editing. You can rename it and change the color at the top. Then select PIN and assign it to D0, where you will connect the relay.
Click OK on the top right. Click the play button on the top right. Your Blynk program is now complete (your Particle should now be online)!
Next you will disconnect power to your Photon and place it onto your breadboard wire it with the relays, resistor, and reed switch according to the Fritzing diagram and image below
.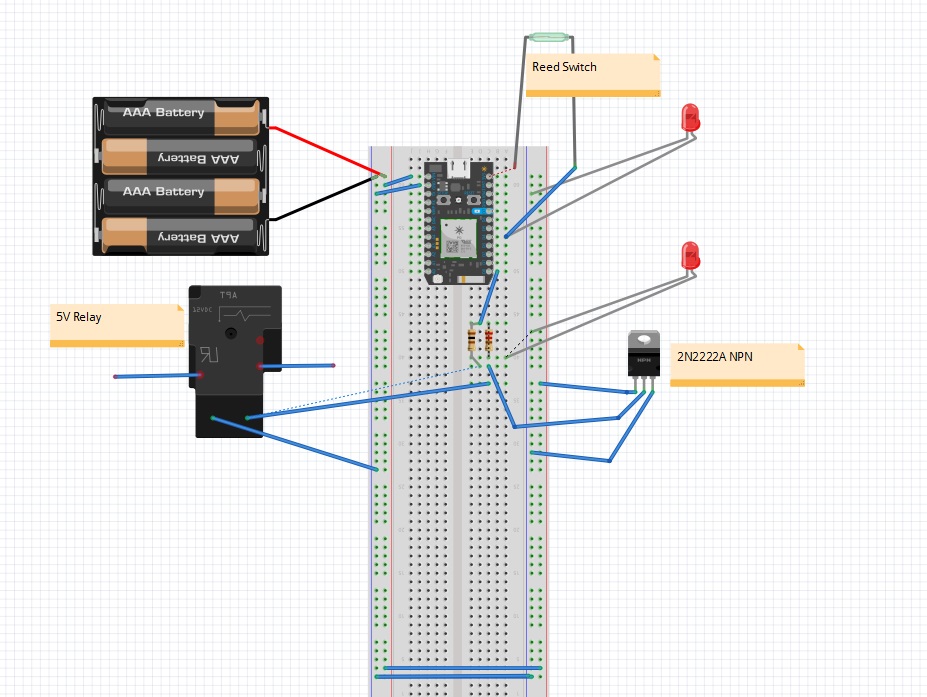
A more reliable power source would be a mini usb cable and usb to wall adapter. The batteries likely won’t last long and you may lock yourself out of your garage!
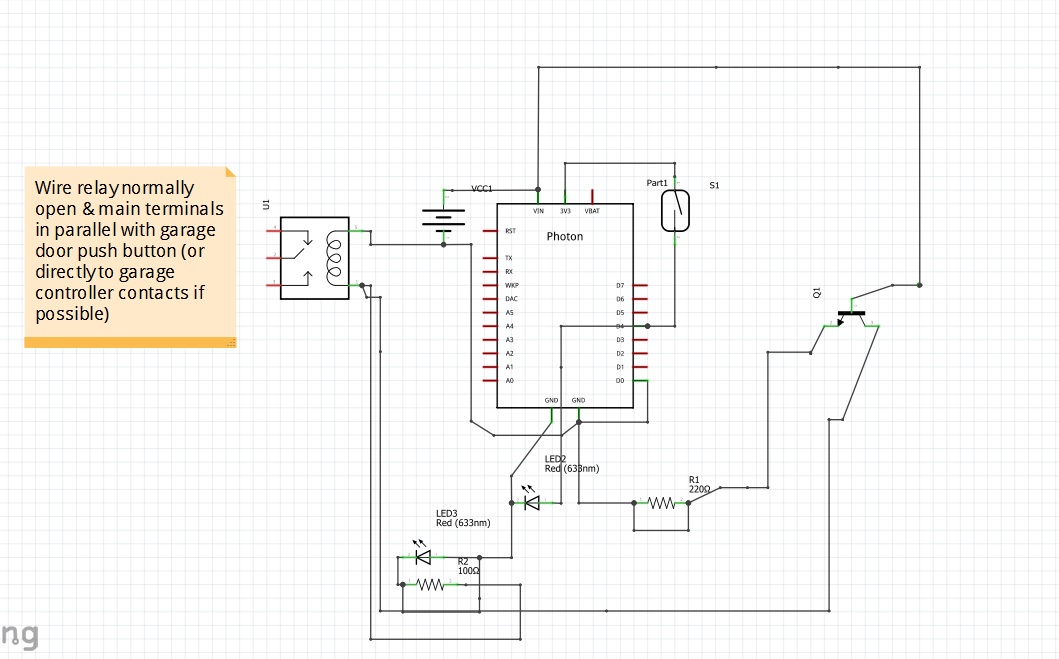
Here is the wiring diagram. (NPN Wiring. Pin 1: Emitter to Ground Pin 2: Base to 100 Ohm Resistor Pin 3: Collector to Relay coil
You must wire in your relays in parallel with your garage’s push button. WARNING: Disconnect the power to your garage opener first!!!
Once it is wired according to the circuit diagram and in parallel with your garage door button your push button switch on your smartphone will control the garage just as your wall switch does. Bring power back to the garage door opener and to your Photon and test.
Step 2: Status updates
In order to receive status updates via text or email all you need to do is to log onto IFTTT and setup an account. Find the Particle app and the SMS apps by searching then you can create a new IF PARTICLE THEN SMS application.
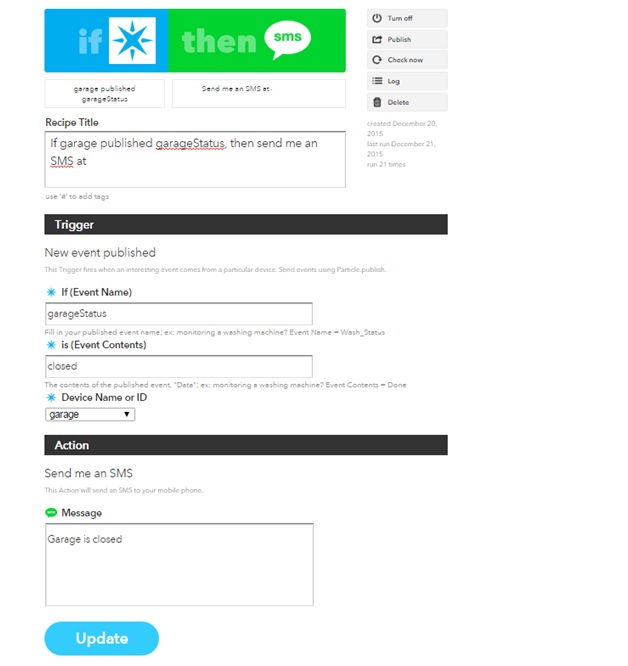
You will include the statement “If garage published garageStatus, then send me an SMS at 5558675309” after linking your mobile phone to the SMS application. Once this is saved you and your reed switch is connected you will begin receiving notifications.
You could modify this application to for many other applications in your home in order to control your other electrical appliances. Don’t forget to use a licensed electrician to help you install the relay on any high voltage equipment. We hope you found this informative and enjoy tinkering!
Please like us on Facebook and Twitter to receive future updates.
Hi Sam,
Very nice project. i made the Garage opener. The garage opener part is working fine but the SMS setup in IFTTT is not working please let me know how to setup SMS in IFTTT. I already set the Particle and SMS app in IFTTT. Please let me know how to setup particle and SMS setting.
Thanks
Gur