
NRF24 Wireless Communication Developer Kit
SKU NRF24-WIRELESS-COMMUNICATION-DEVELOPER-KIT
Save 25%! Add to cart to see final price.
Sold out
Original price
$111.20
-
Original price
$111.20
Original price
$111.20
$111.20
-
$111.20
Current price
$111.20
We're sorry, this item is discontinued.
For help finding an alternative product, please call 1-800-528-1417 or email sales@circuitspecialists.com and we'll be happy to assist.
Availability:
Out of stock
nRF24 Wireless Communication Network Developer kitIntroduction: the 
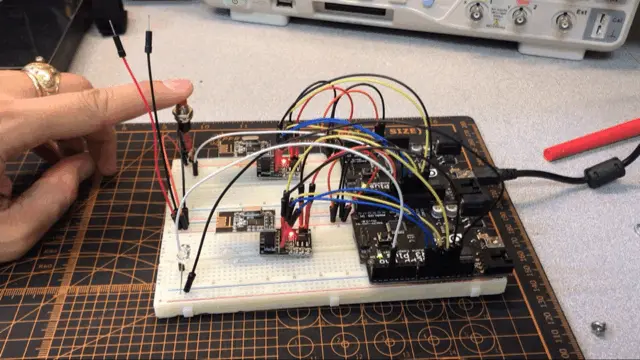
Wireless Communication Network Developer (WCND) kit provide Makers with all the needed to build a low cost communication network for DIY project. This kit aiming to expand your project to a next, level where you can control system or retreat data from weather station.Wiring: ( same for transmitter and receiver)
VCC - 3.3V
GND - GND
CE - pin 9
CSN - pin10
SDK - pin 13
MOSI - pin 11
MISO - pin 12Coding:The nRF24 breakout board is optional, it would keep the power to the nRF24 radio module constant and provide better connection. If you decide to go with the nRF24 breakout board, the wiring will be the same however now you can supply it with 5V.The code would be simple and straightforward when you press the switch button, the receiver reads the signal and turns on the LED.The Transmitter code:/*
-----------------Note----------------------
Date: 01-09-2020
Project Name: CS_Radio_Module
Goal: Testing Control_box_Radio Module_Tranmitter
Author: Khang Nguyen
*/
#include
#include
#include
RF24 radio(9, 10); // CE, CSN
const byte address[6] = "00001"; //Byte of array representing the address. This is the address where we will send the data. This should be same on the receiving side.
const int L_button = 7;
const int R_button = 6;
boolean L_state = 0;
boolean R_state = 0;
const int LED2 = 3 ;
const int LED1 = 5 ;
const int Knob = A0 ;
int Knob_Value = 0 ;
long P_Knob_Value = 0 ;
void setup()
{
Serial.begin(9600);
pinMode(R_button, INPUT);
pinMode(L_button, INPUT);
pinMode(LED1, OUTPUT);
pinMode(LED2, OUTPUT);
radio.begin(); //Starting the Wireless communication
radio.openWritingPipe(address); //Setting the address where we will send the data
radio.setPALevel(RF24_PA_MIN); //You can set it as minimum or maximum depending on the distance between the transmitter and receiver.
radio.stopListening(); //This sets the module as transmitter
}
void loop()
{
L_state = digitalRead(L_button);
R_state = digitalRead(R_button);
if(R_state == HIGH){digitalWrite(LED2,HIGH);} else {digitalWrite(LED2,LOW);}
if(L_state == HIGH)
{
const char text[] = "Your Button State is HIGH";
radio.write(&text, sizeof(text)); //Sending the message to receiver
digitalWrite(LED1, HIGH);
Serial.println("Your Button State is HIGH");
}
else
{
const char text[] = "Your Button State is LOW";
radio.write(&text, sizeof(text)); //Sending the message to receiver
digitalWrite(LED1, LOW);
Serial.println("Your Button State is LOW");
}
radio.write(&L_state, sizeof(L_state)); //Sending the message to receiver
delay(80);
}The receiver code:
/*
-----------------Note----------------------
Date: 01-08-2020
Project Name: CS_Radio_Module
Goal: MrK_Radio_Module_Receiver
Author: Khang Nguyen
*/
#include
#include
#include
RF24 radio(9, 10); // CE, CSN
const byte address[6] = "00001";
boolean button_state = 0;
int led_pin = 3;
void setup()
{
pinMode(led_pin, OUTPUT);
Serial.begin(9600);
radio.begin();
radio.openReadingPipe(0, address); //Setting the address at which we will receive the data
radio.setPALevel(RF24_PA_MIN); //You can set this as minimum or maximum depending on the distance between the transmitter and receiver.
radio.startListening(); //This sets the module as receiver
}
void loop()
{
if (radio.available()) //Looking for the data.
{
char text[32] = ""; //Saving the incoming data
radio.read(&text, sizeof(text)); //Reading the data
radio.read(&button_state, sizeof(button_state)); //Reading the data
if(button_state == HIGH)
{
digitalWrite(led_pin, LOW);
Serial.println(text);
}
else
{
digitalWrite(led_pin, HIGH);
Serial.println(text);}
}
delay(50);
}