Smart House Project – Part 2
A smart house should provide its occupants with more than just comfort. It should also provide a sense of security and a smart house is no different. For the sake of argument, a smart house should do more than just provide a passive defense system for stopping intruders. A smart house should be equipped with a sensor system that actively listens to outside noise.
In Today’s project, we will use a speaker and a Piezo element as a sound sensor. If you are following along with the ARD-02 201 Arduino Basics Starter Kit, this will be covered under these 2 lessons: Melody (pg.53) and Knock Sensor(pg.63). I will be referencing the information from these 2 lessons as they provide a great deal of information such as schematics, circuit and coding theory, explanation, etc.
Part list
100 Ohm resistor
Speaker
1M Ohm resistor
Piezo Buzzer
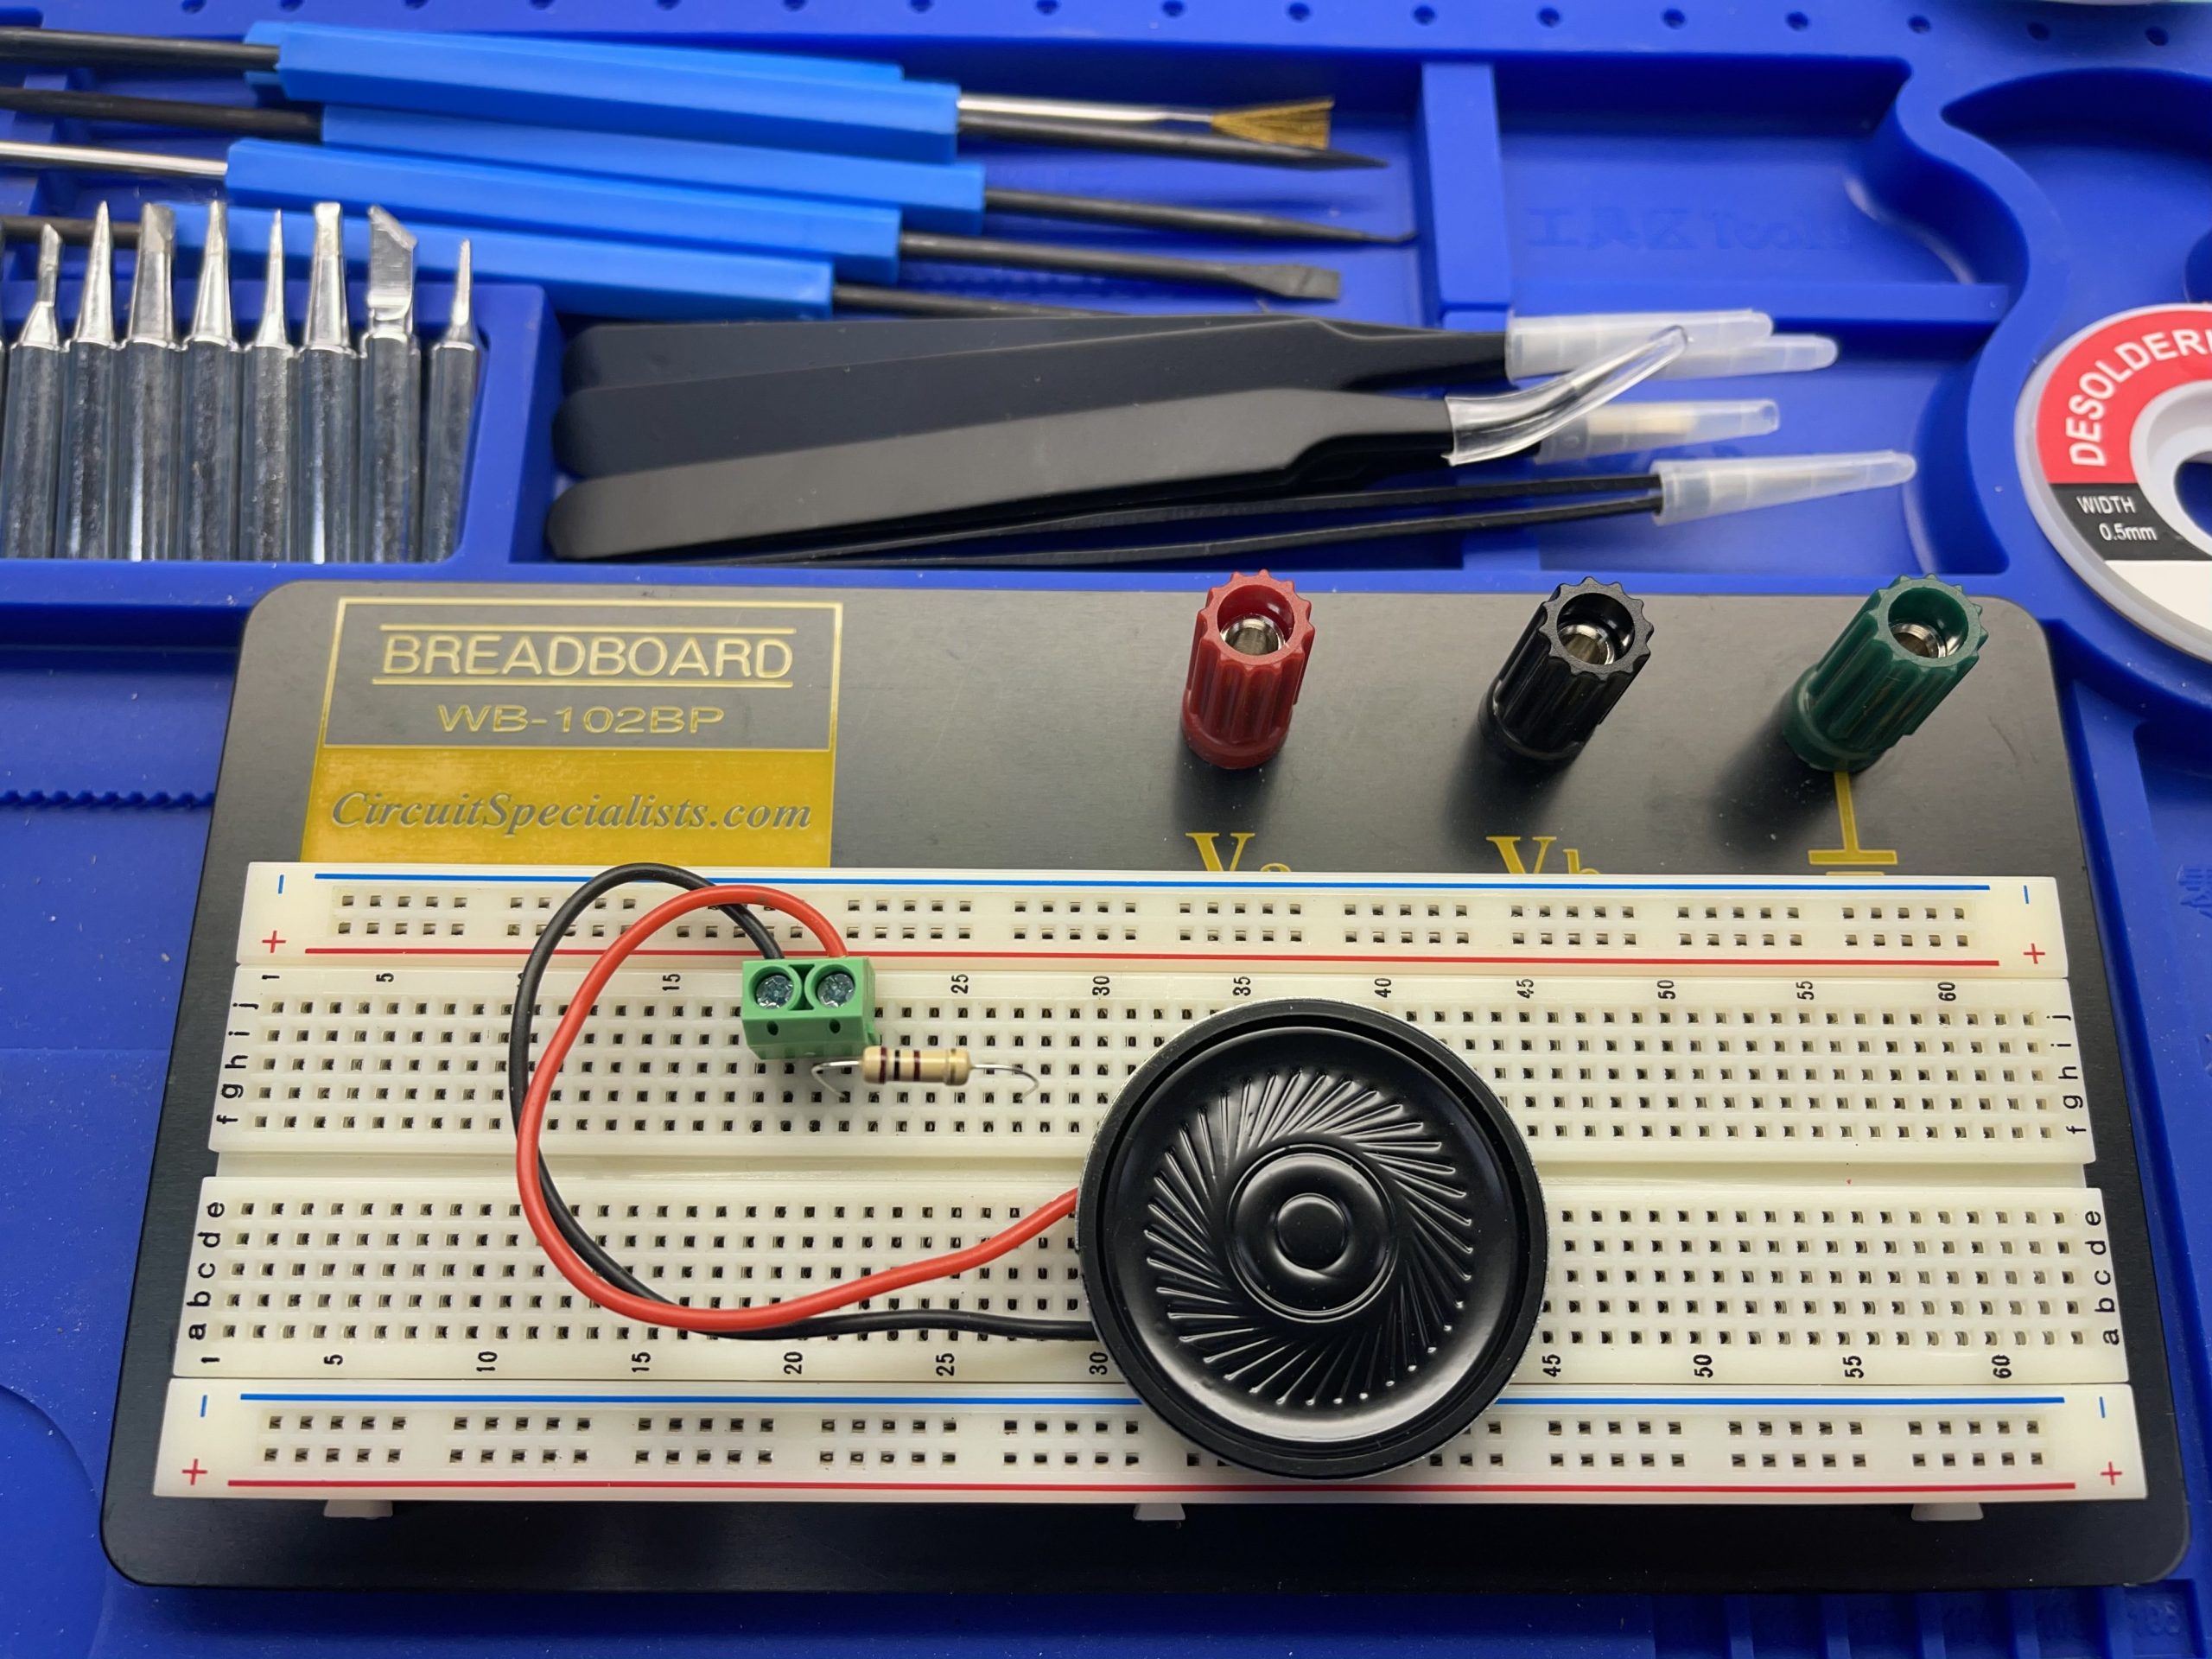
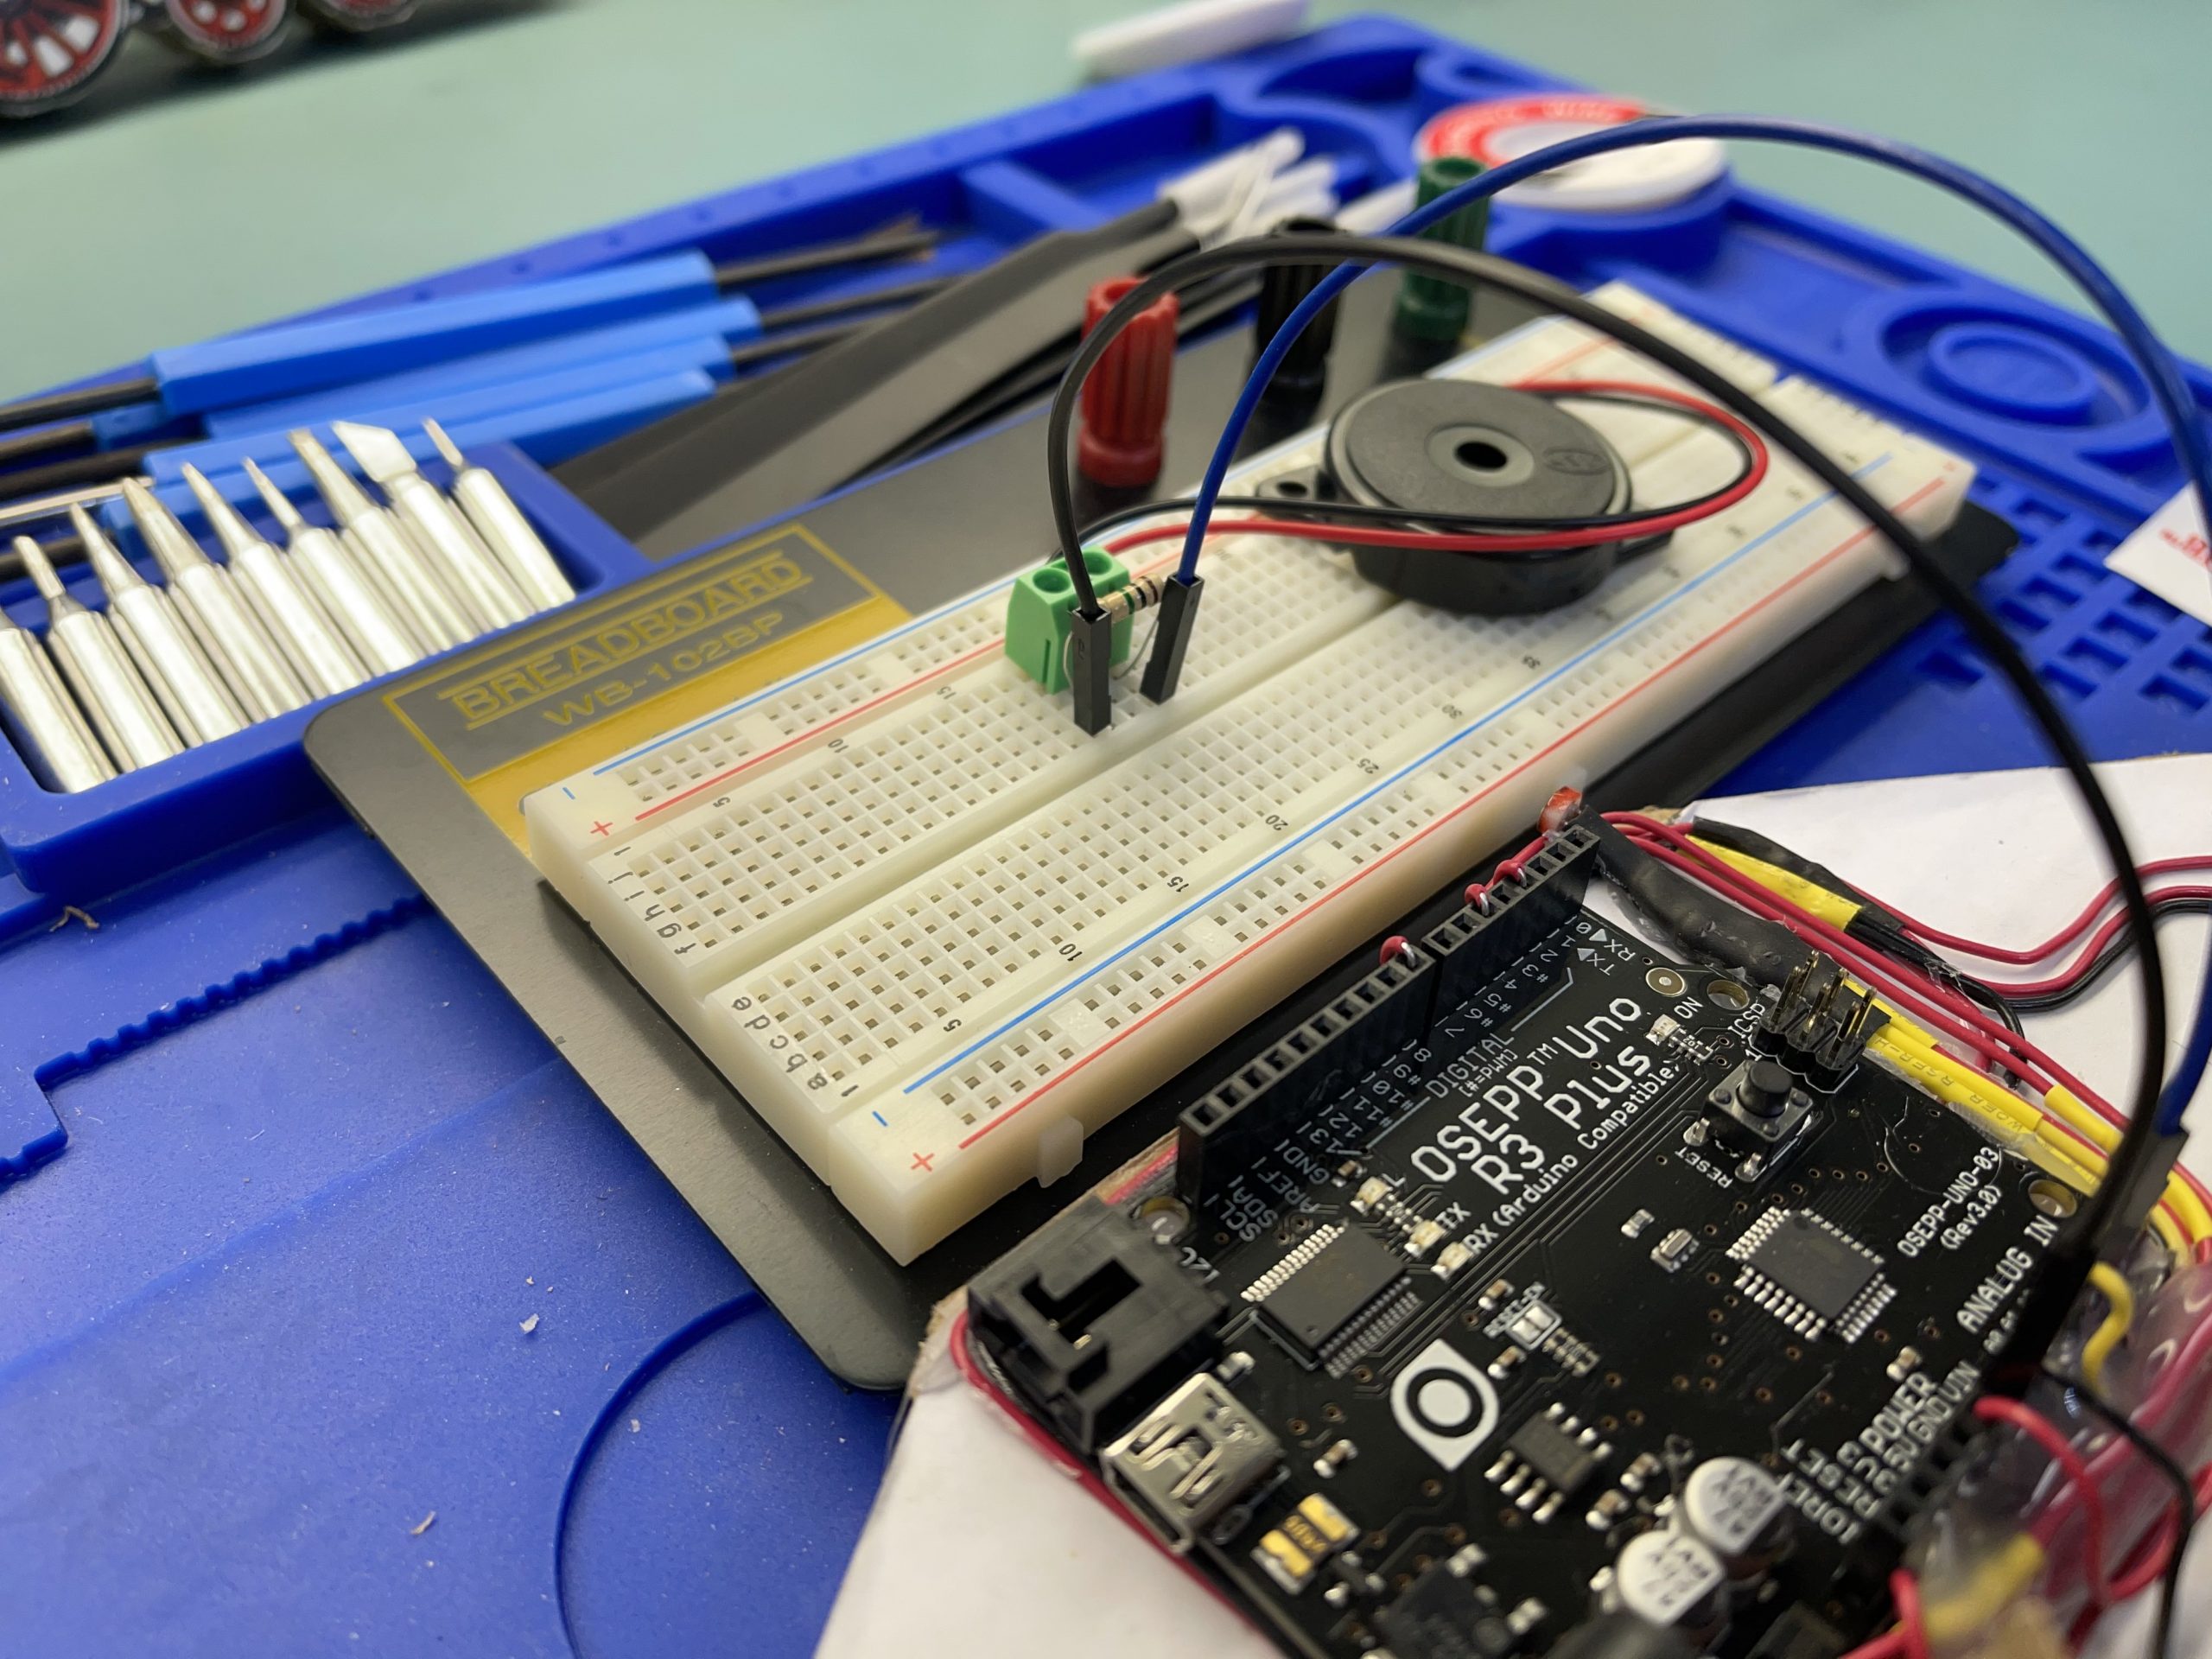
Sound Circuit
The sound circuit is fairly simple to assemble, the resistor connects to the speaker in series.
Plug the circuit into an Uno to make sure everything works. OSEPP provided the sound example code in this link http://osepp.com/files/osepp_201K.zip
I will attach the schematic below for your reference or page 55 on the OSEPP handbook.
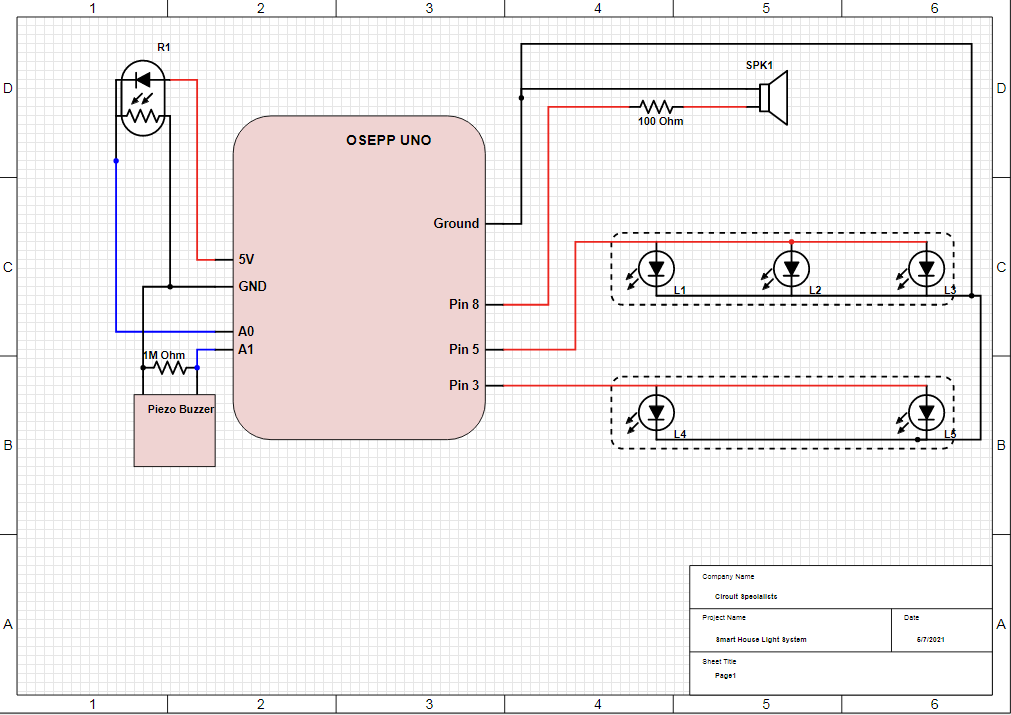
Now, we will try to build the same circuit with a slightly bigger speaker for our house.
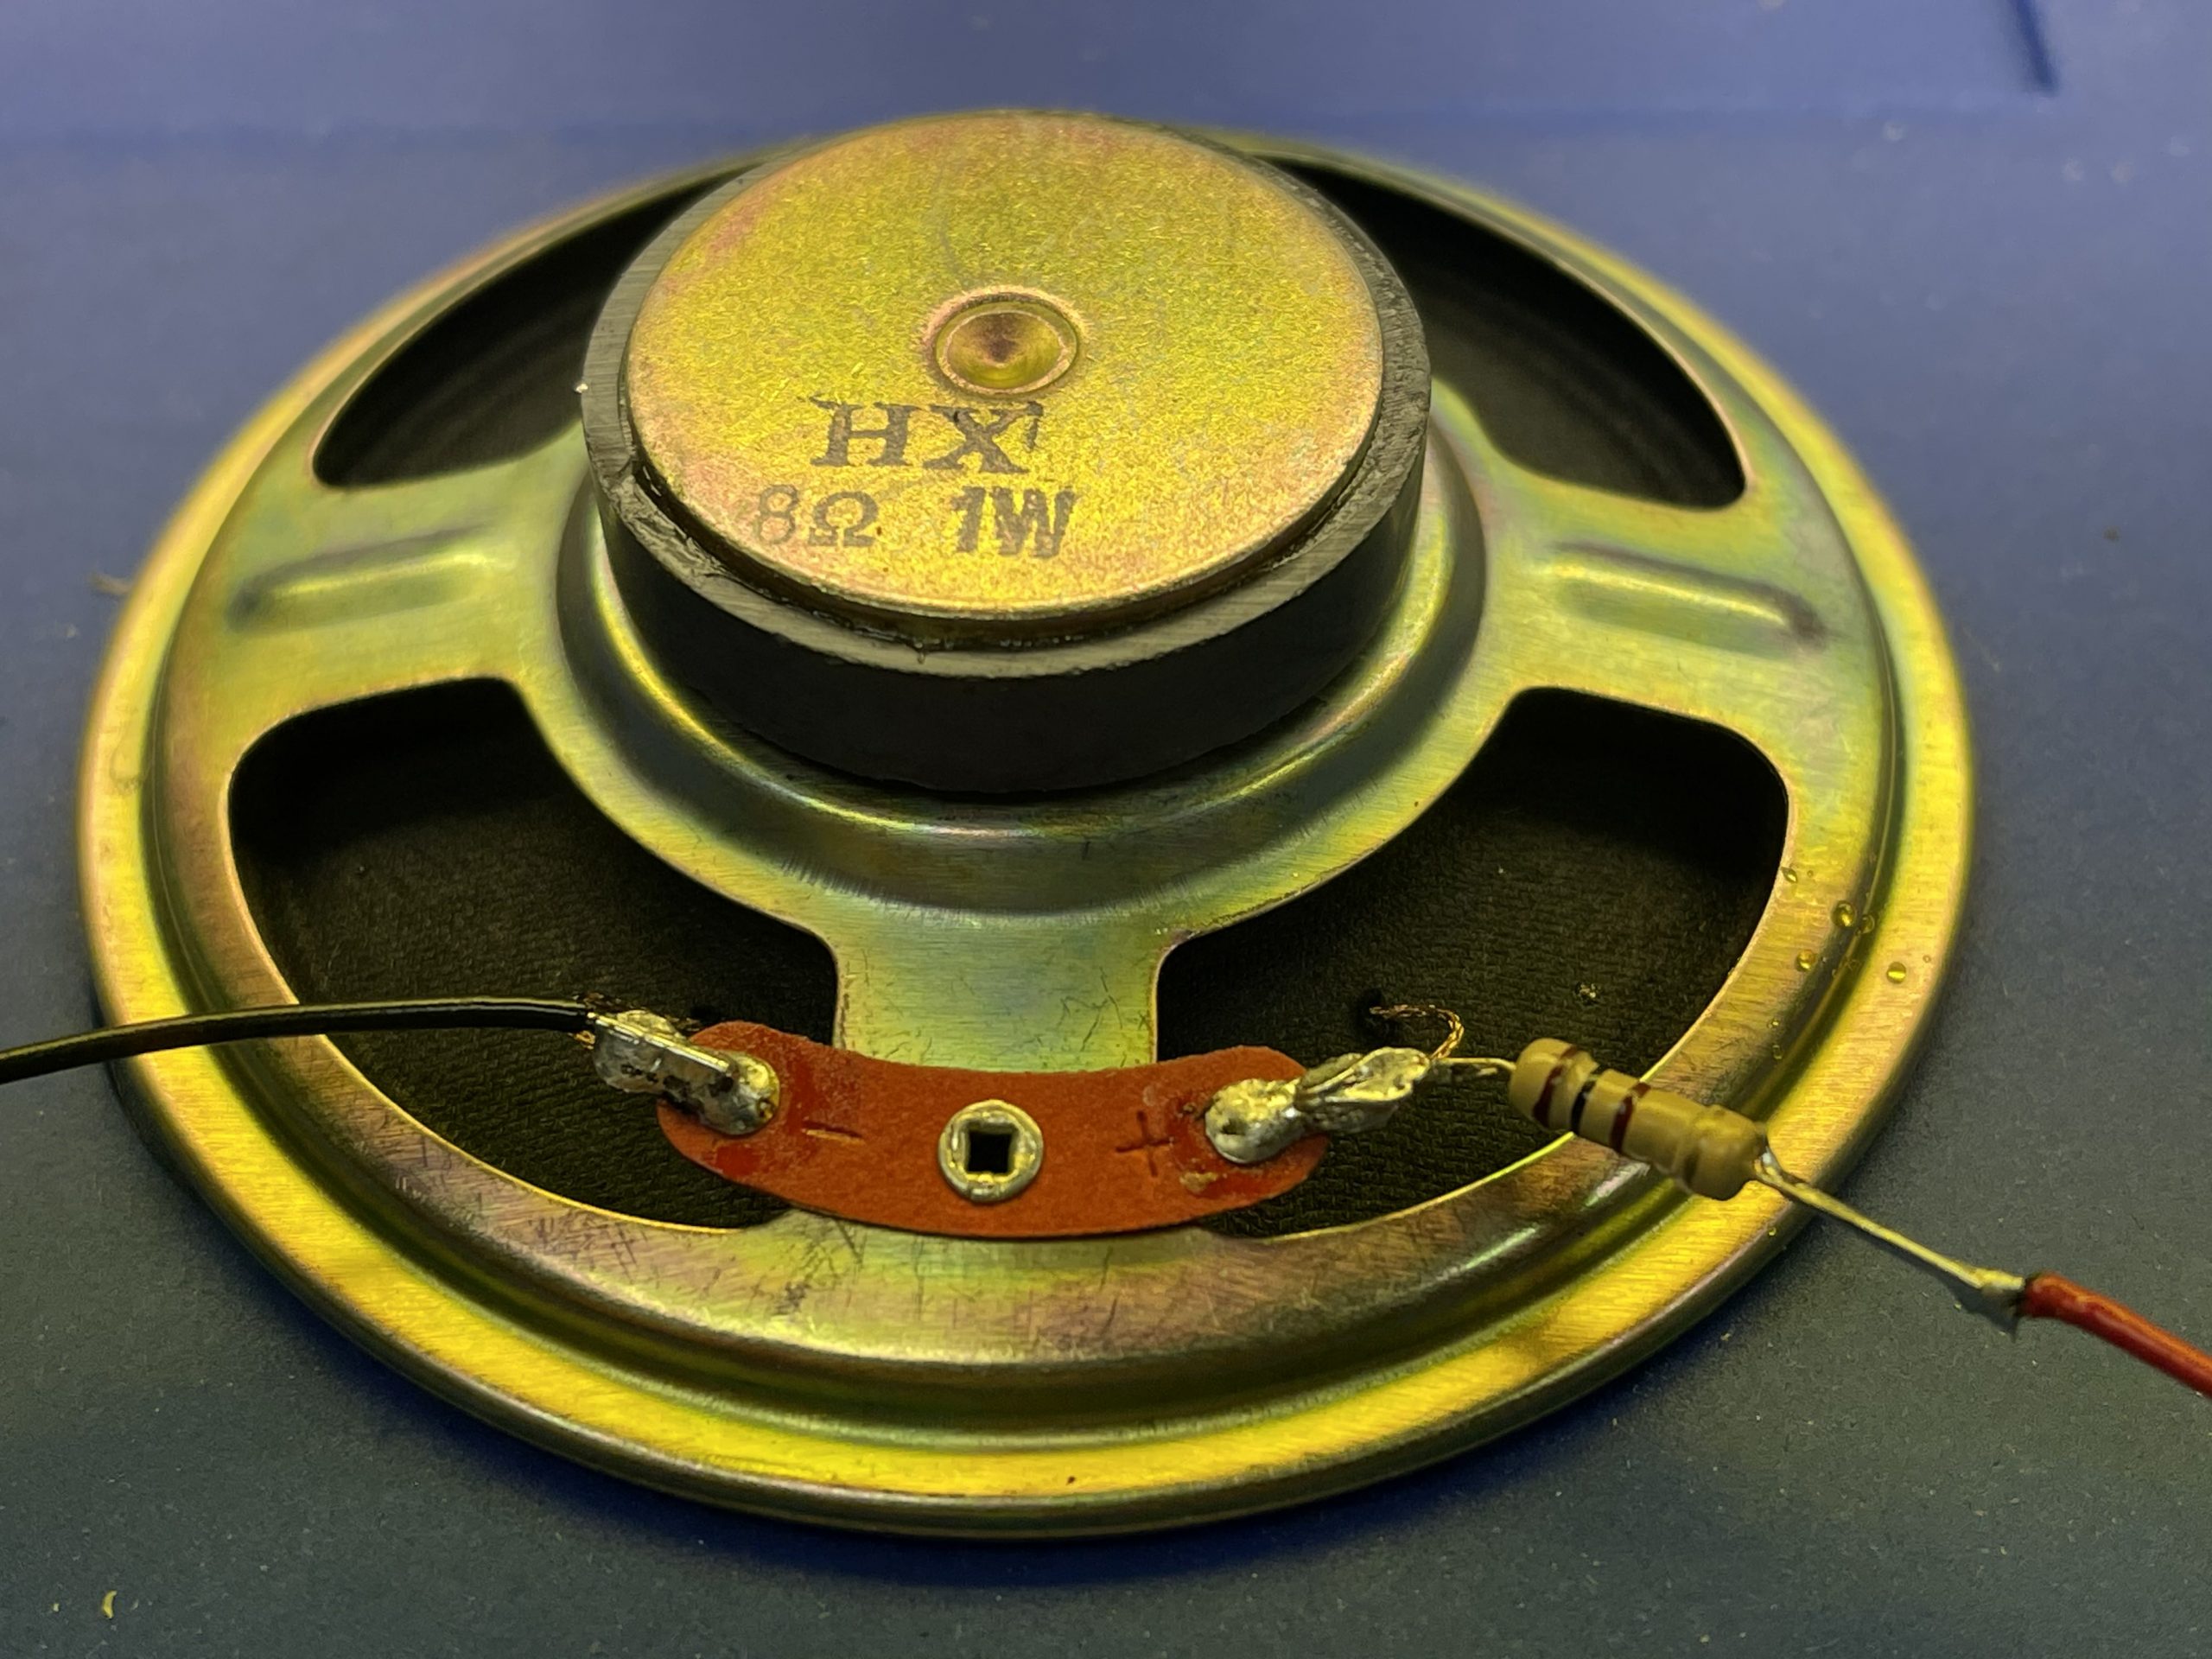
Finally, you can protect the resistor by covering it with a T3 heat shrink tube and then set it aside.
Knock Sensor Circuit
This circuit is also fairly simple to build and test out before installing in the house.
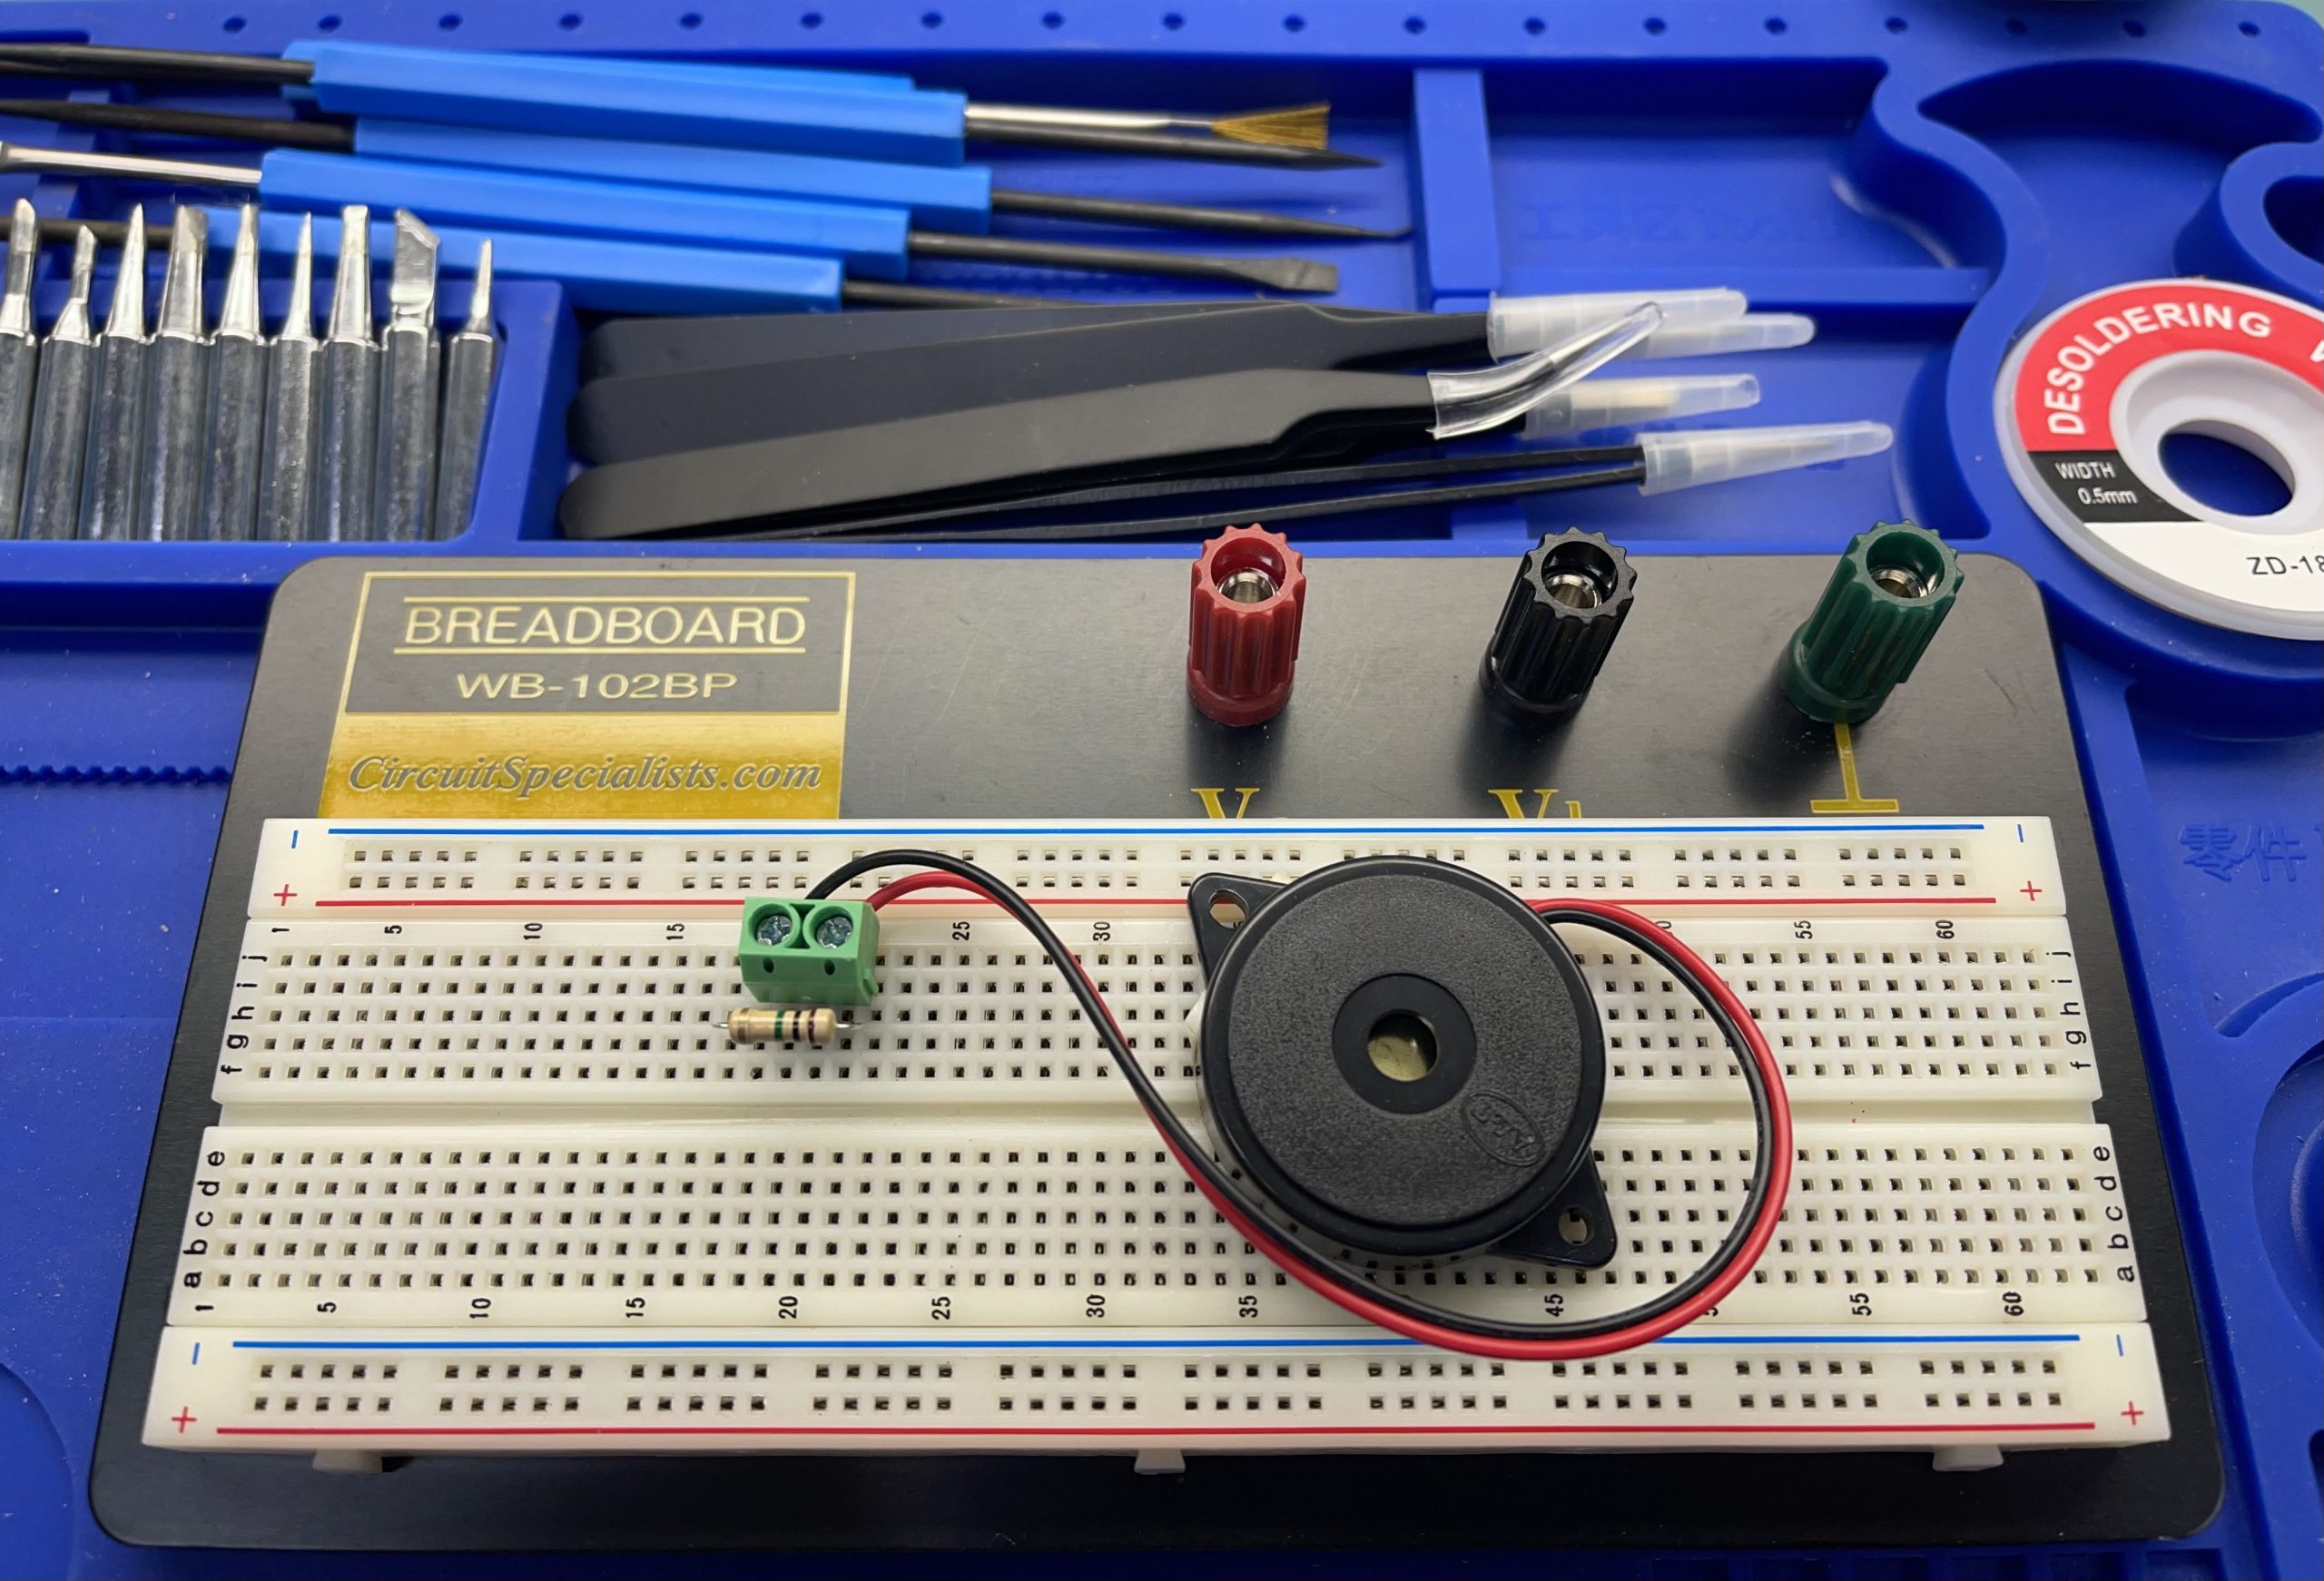
I usually upload the provided code from OSEPP to make sure the system works before moving on to the next step.
Now we need to build the sound sensor so that it can go into the smart house project. The resistor is connected parallel to the Piezo Buzzer.
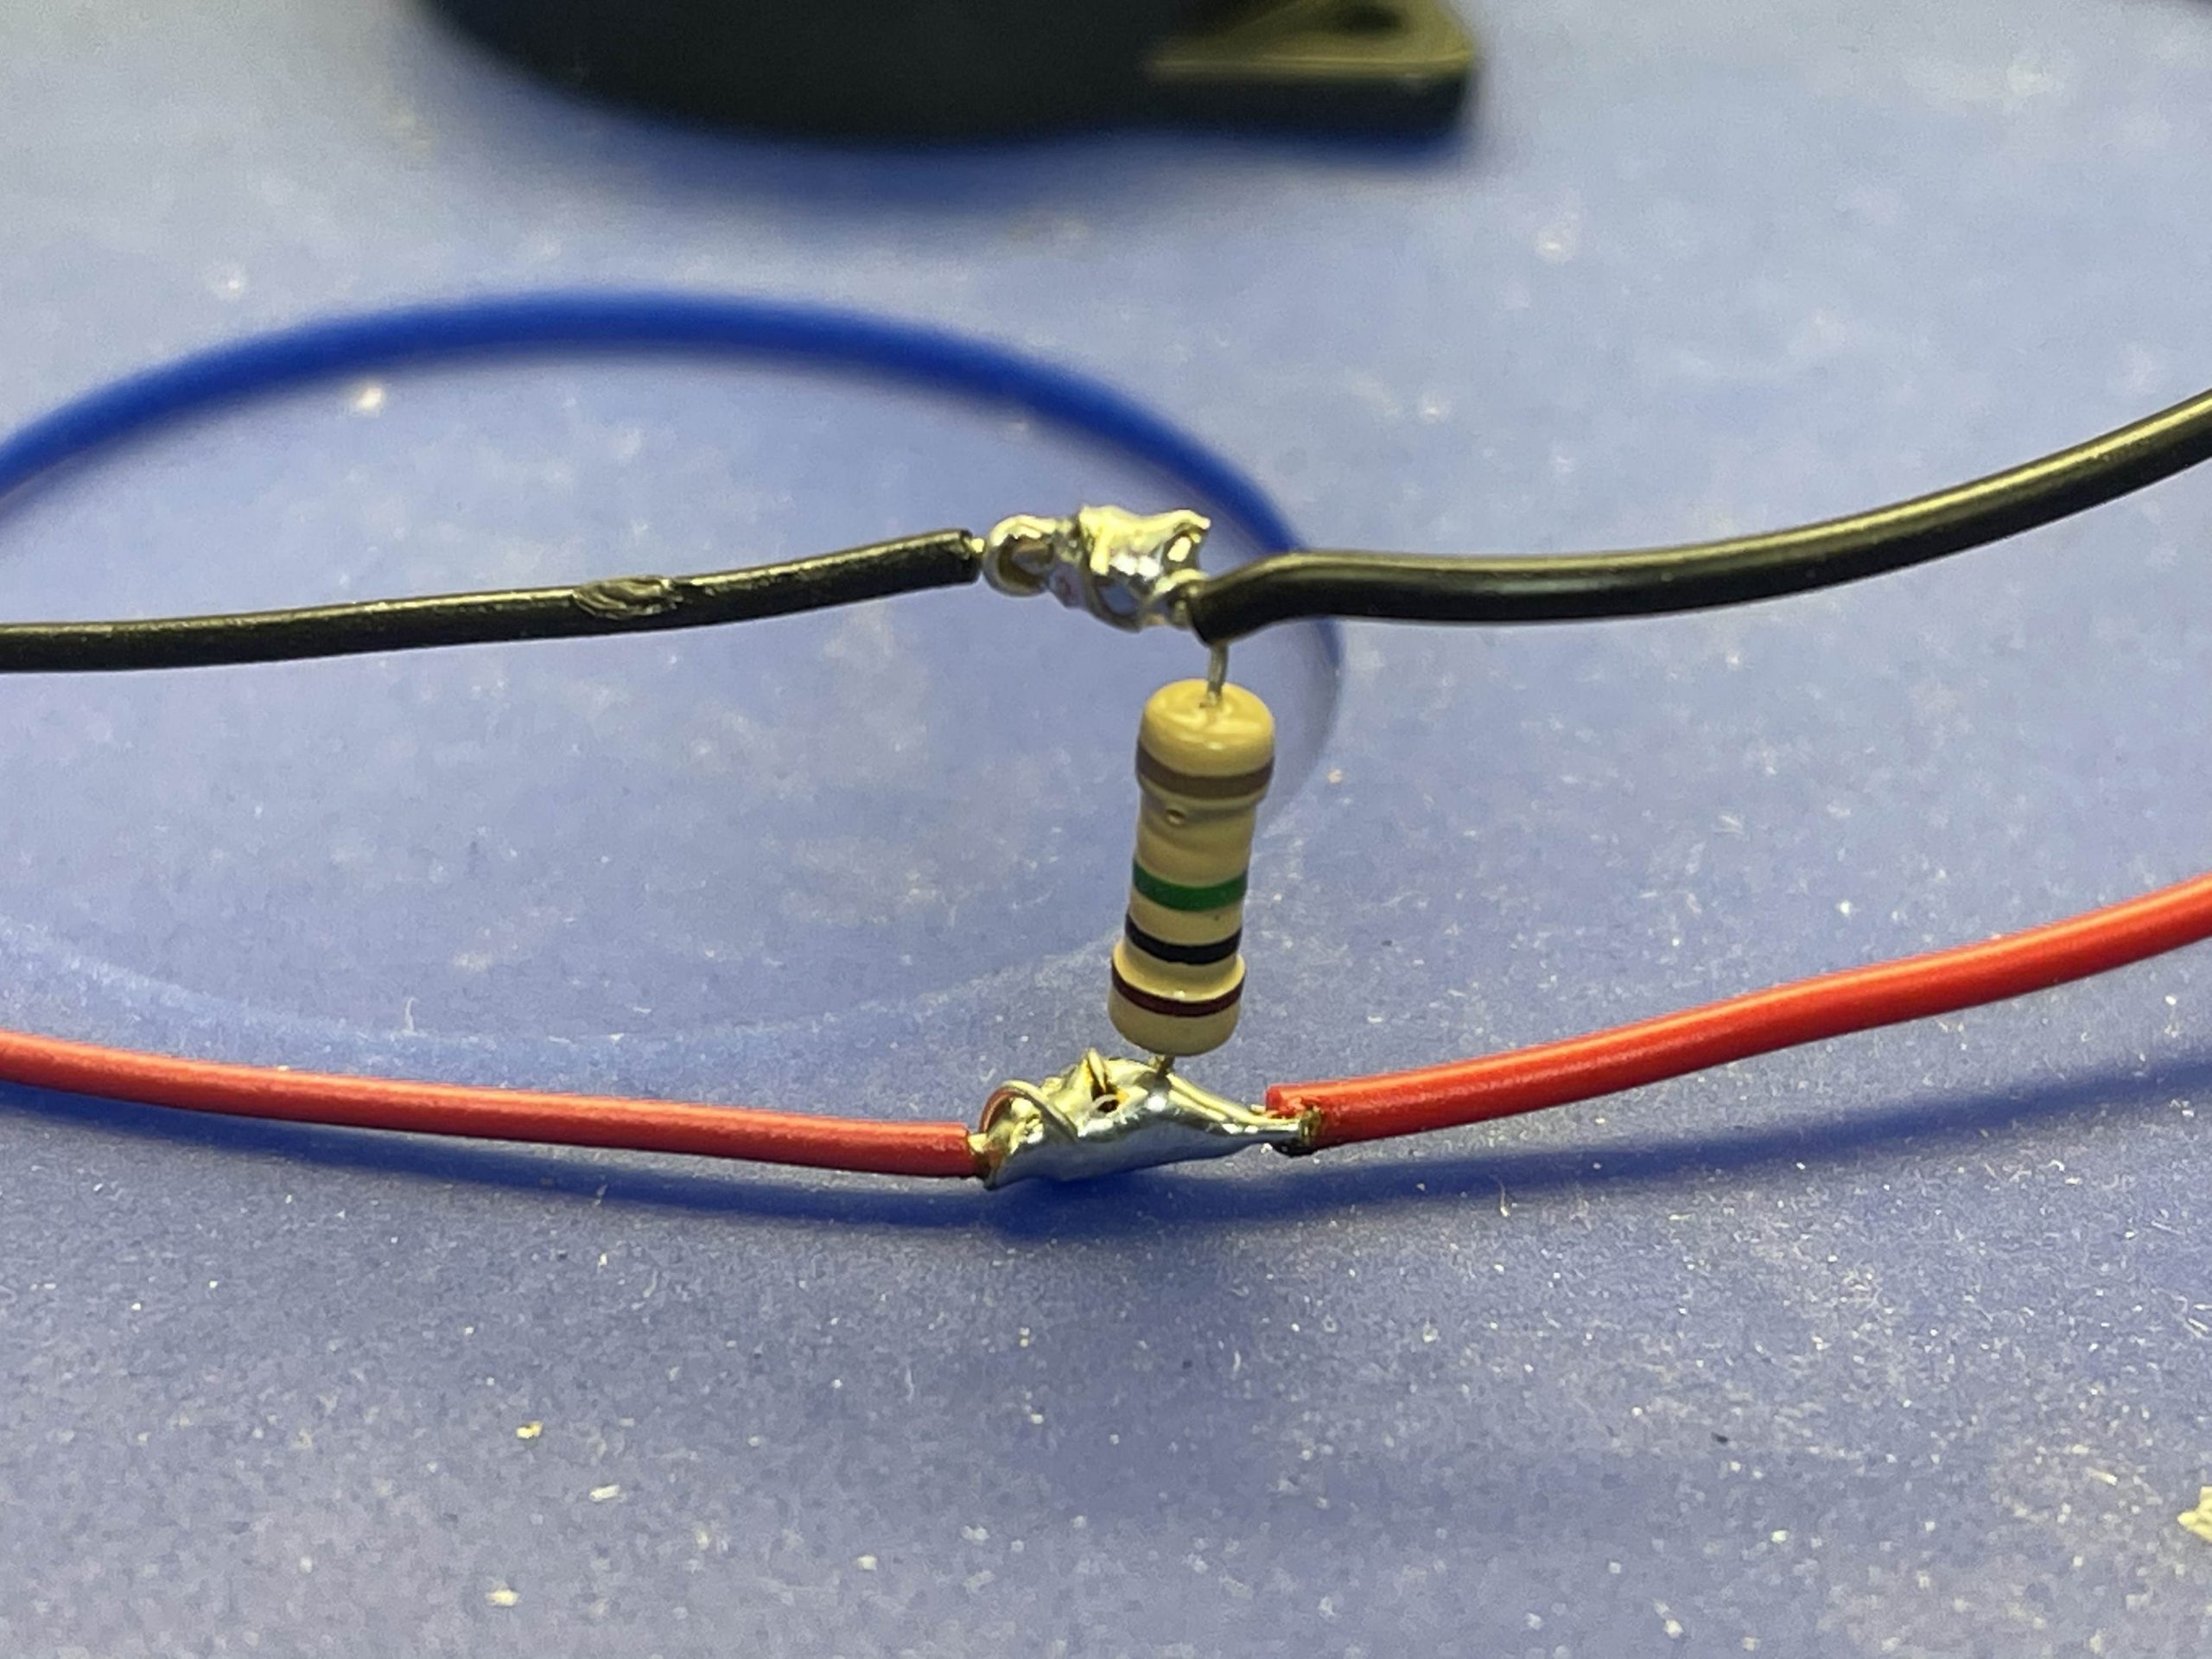
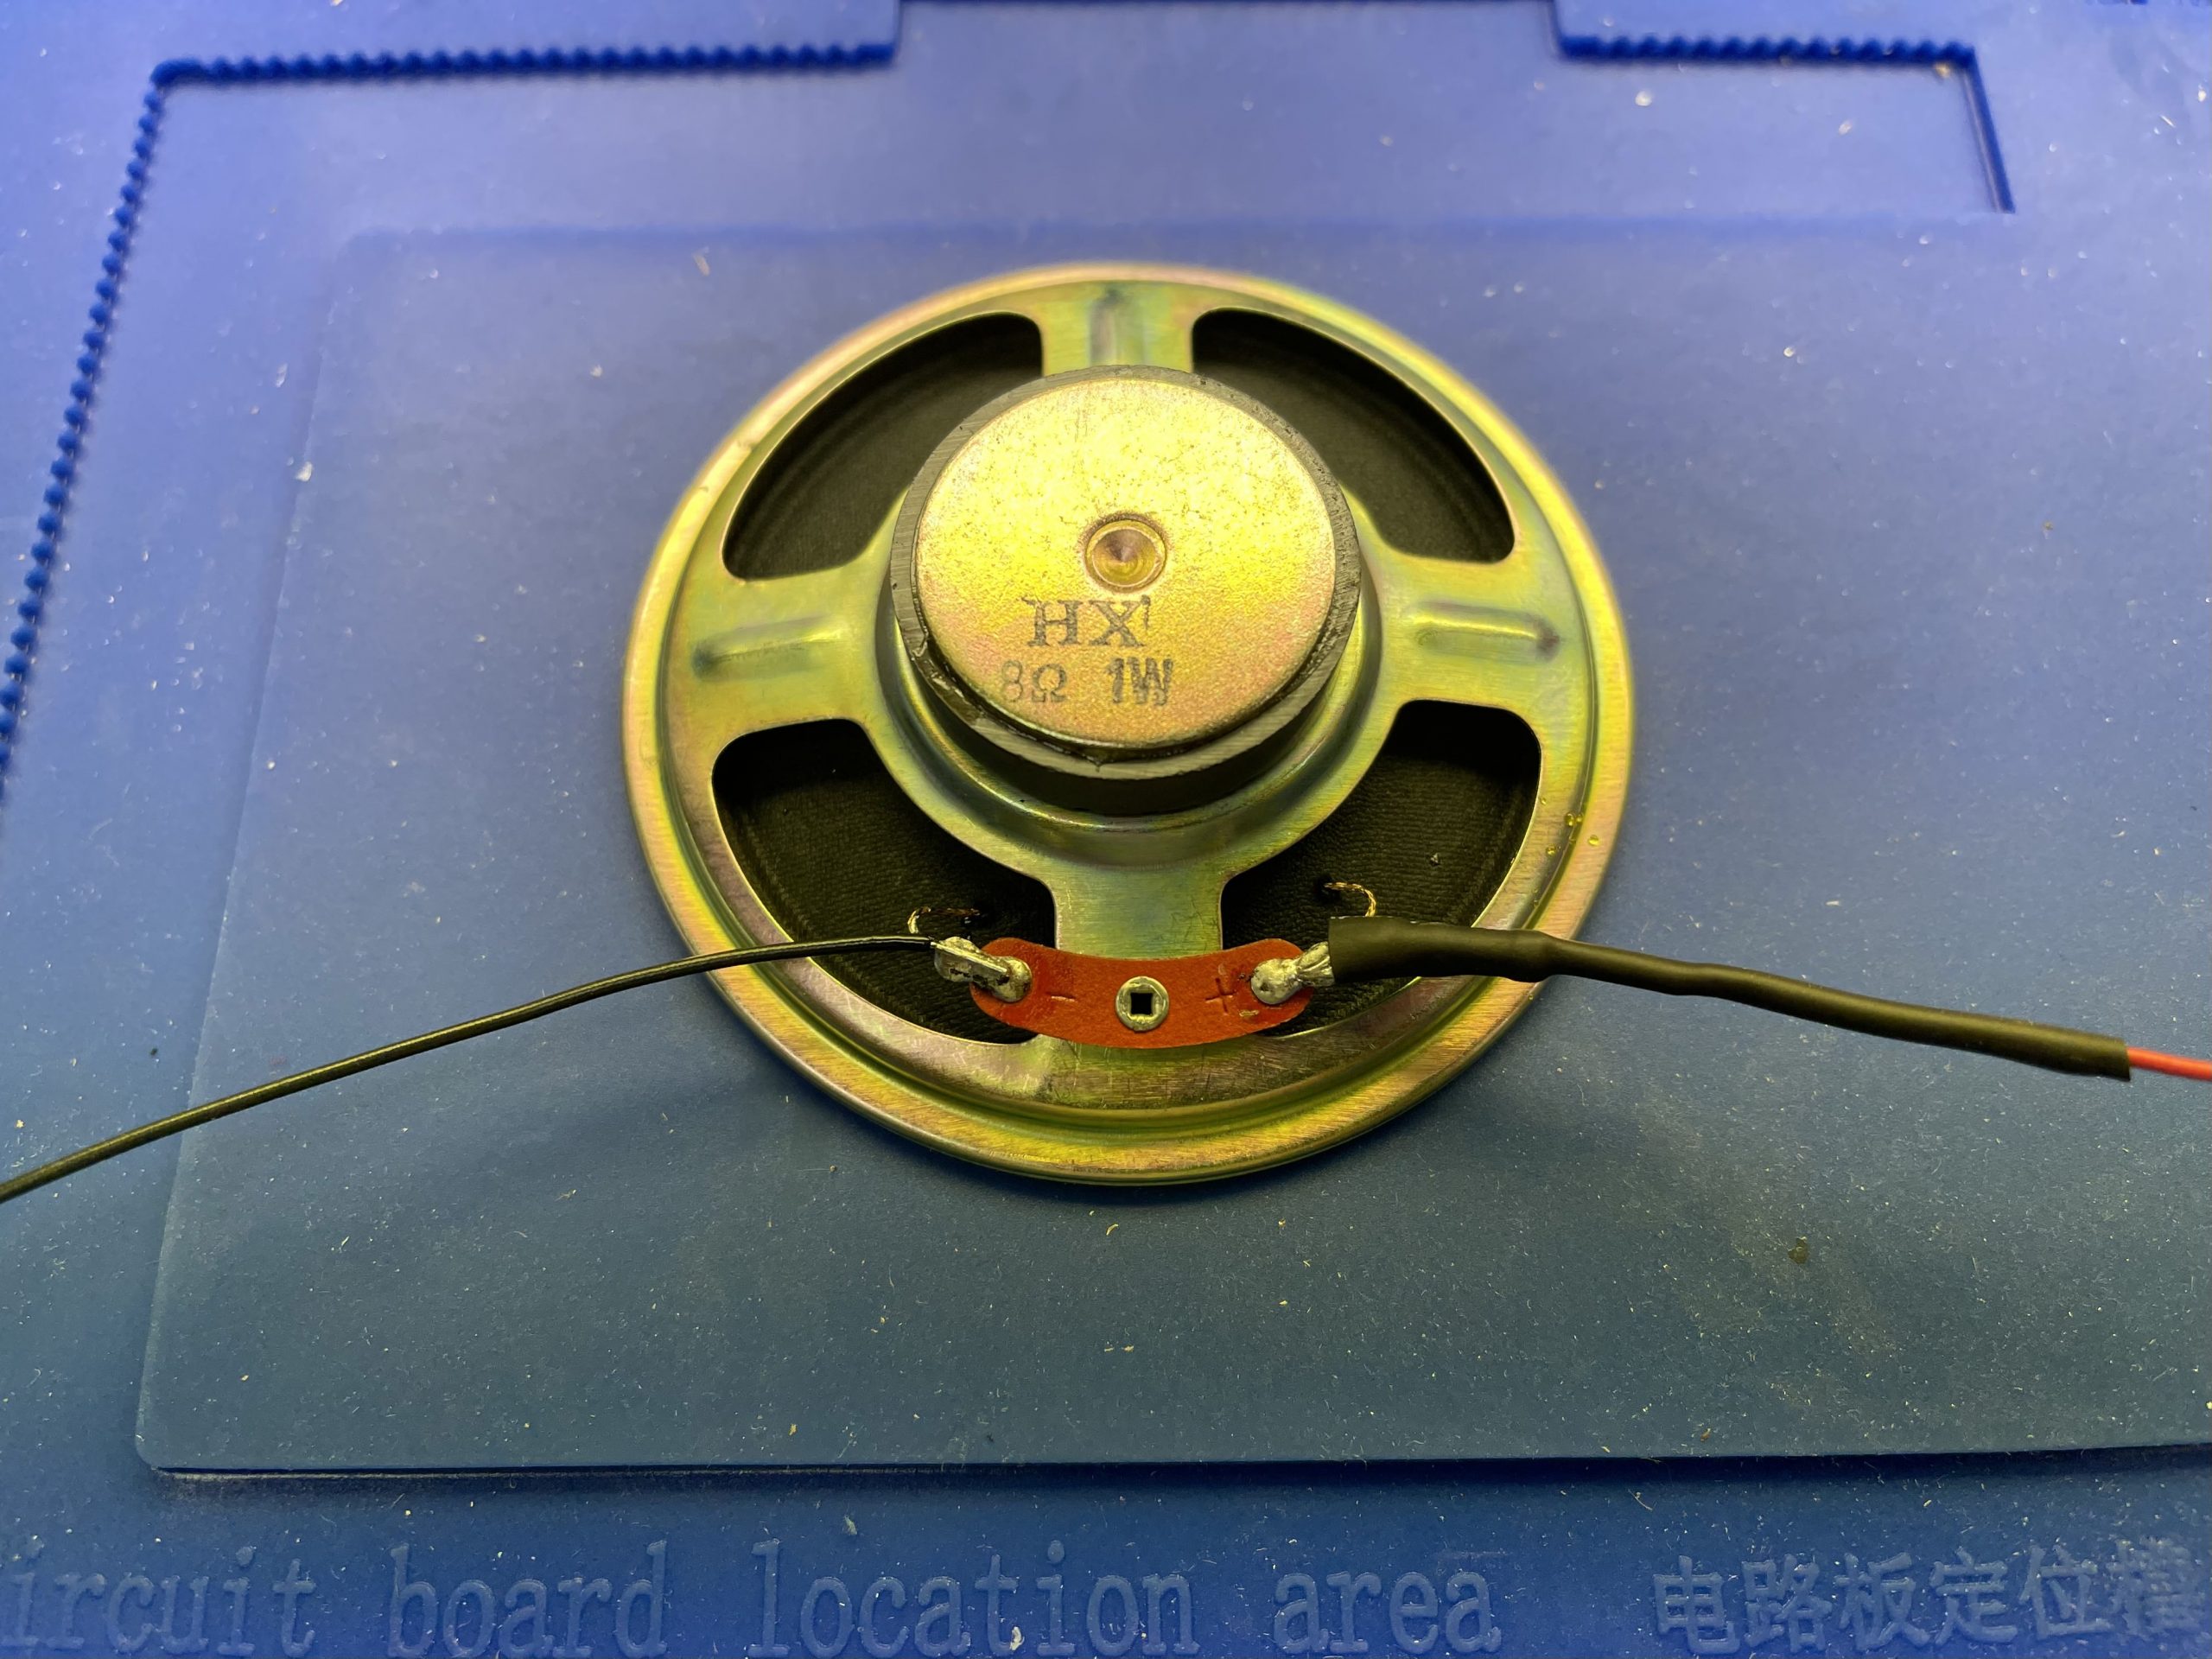
Fold the wires down so the heat shrink tube can go over it.
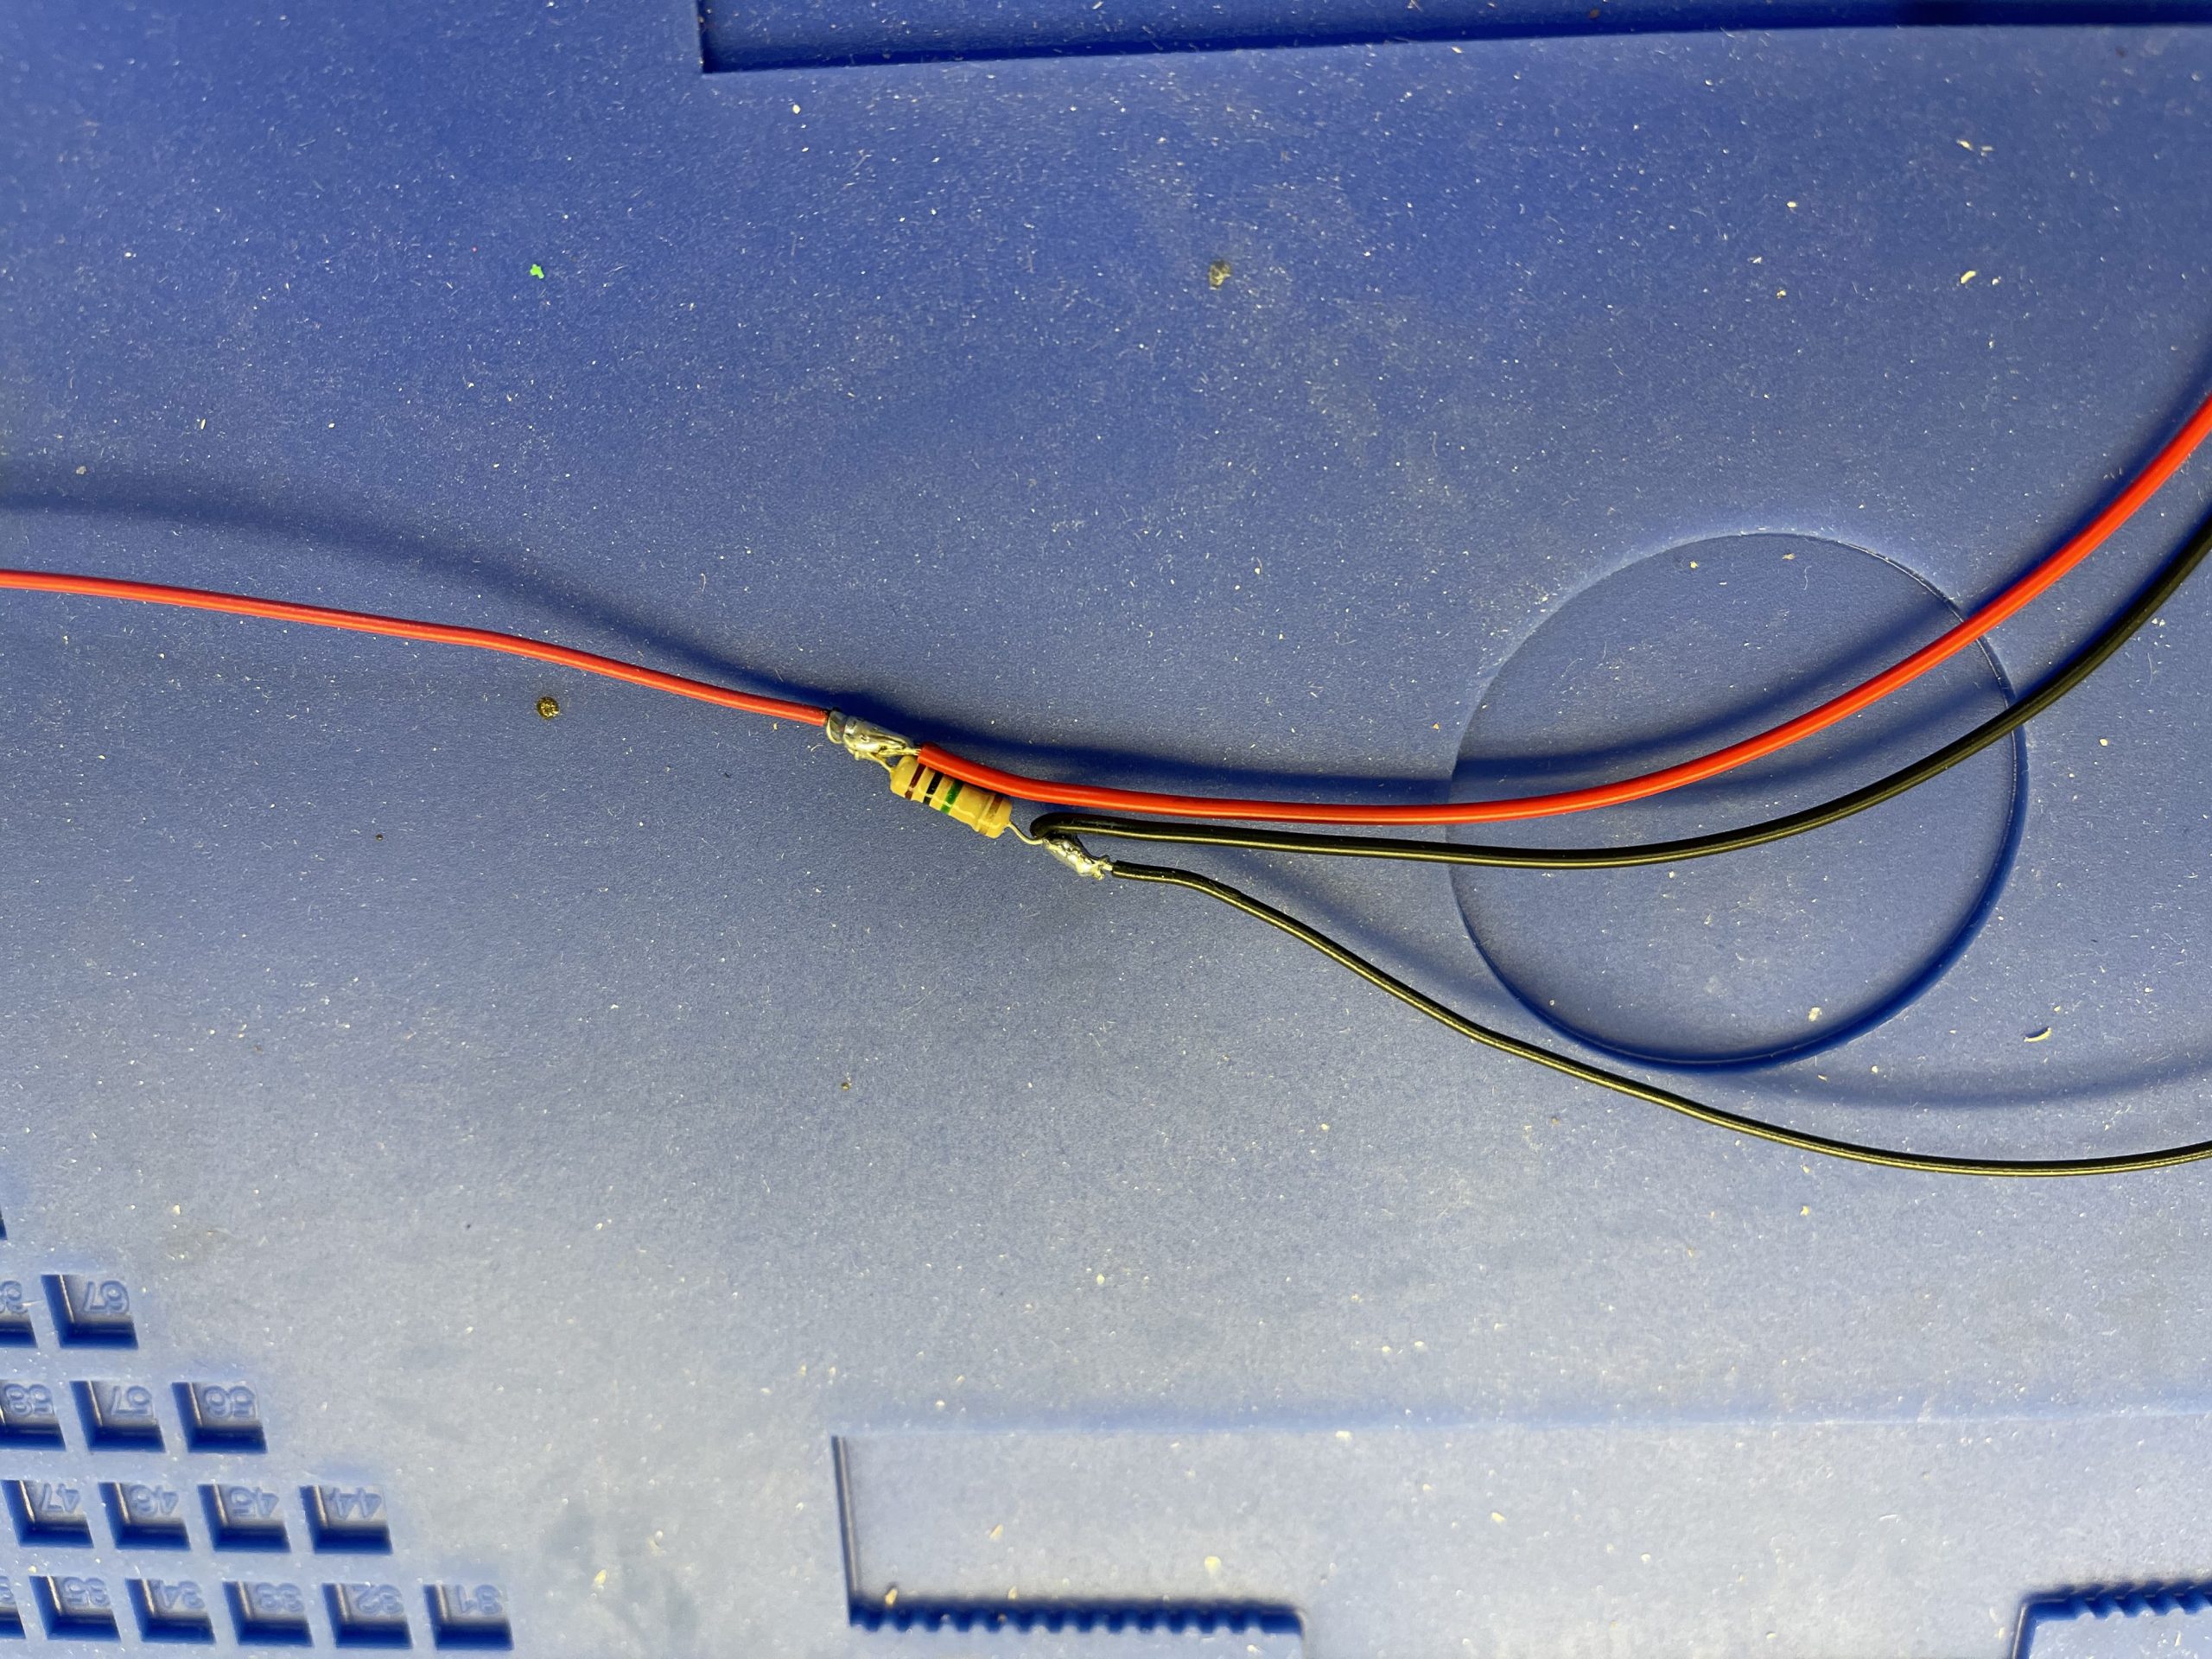
The final product should look like the photo below.

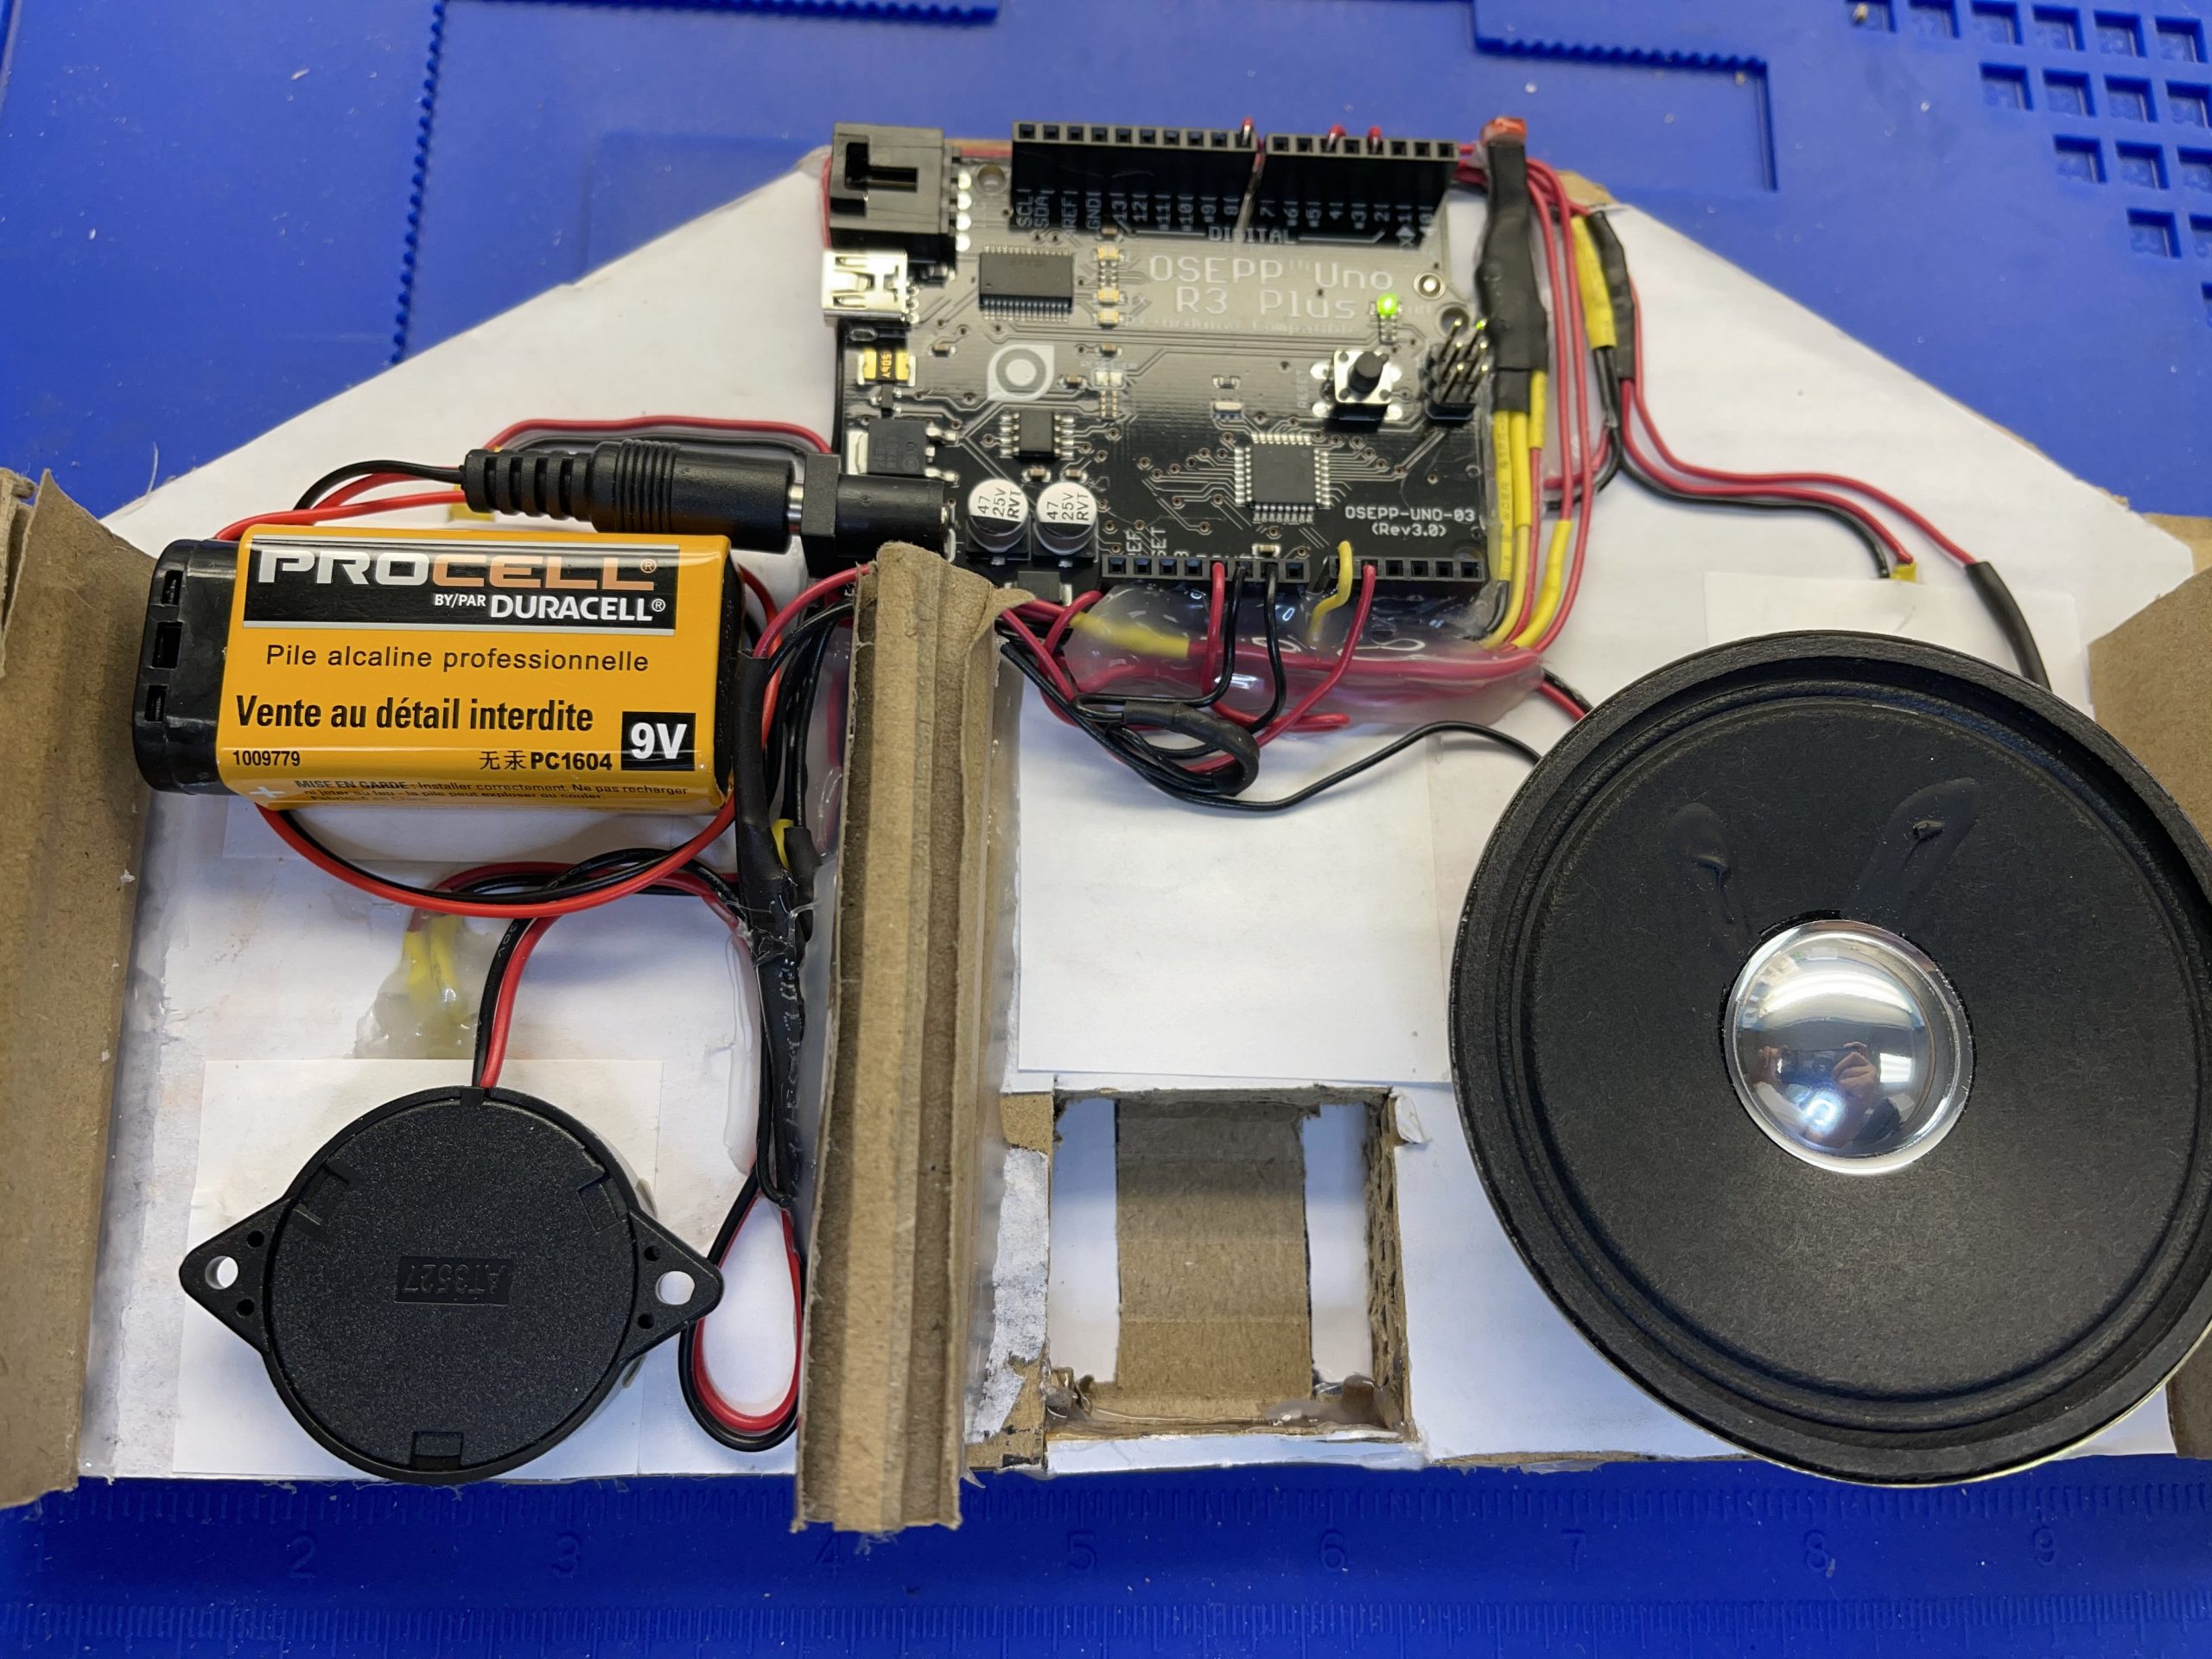
Next, install the Sound system and the Knock Sensor to the house. Give yourself a pat on the back because the hard part is done. We will go over the code below.
The Code
I will go over what changes only and the full code file will be attached below in case you need it.
In the Light Sensor Code, I change Second_Floor_LED to pin 5 so that I can use analogWrite instead of the digitalWrite function.
int First_Floor_LED = 3;
int Second_Floor_LED = 5;

void LightControl(int LightLevel)
{
  int Light = map(LightLevel,0,5,0,250);

    analogWrite(First_Floor_LED, Light);
    analogWrite(Second_Floor_LED,Light);


}

void LightSensor()
{
      int analogValue;
    int range;

// read our photocell
analogValue = analogRead(photocellPin);
// map the sensor range to a range of four options
range = map(analogValue, sensorMin, sensorMax, 0, 3);

// do something different depending on the
// range value
switch (range)
{
    // Dark turn on the light
    case 0:
        Serial.println("dark");
        LightControl(5);
//        digitalWrite(First_Floor_LED, HIGH);
//        digitalWrite(Second_Floor_LED, HIGH);
        break;
    // Dim turn on the light
    case 1:
        Serial.println("dim");
        LightControl(5);
//        digitalWrite(First_Floor_LED, HIGH);
//        digitalWrite(Second_Floor_LED, HIGH);
        break;
    // Medium turn off the ligh
    case 2:
        Serial.println("medium");
        LightControl(0);
//        digitalWrite(First_Floor_LED, LOW);
//        digitalWrite(Second_Floor_LED, LOW);
        break;
    // Bright Turn off the ligh
    case 3:
        Serial.println("bright");
        LightControl(0);
//        digitalWrite(First_Floor_LED, LOW);
//        digitalWrite(Second_Floor_LED, LOW);
        break;
}

// wait 0.25s before reading the photocell again
delay(25);
}
The Alarm system
// iterate over the notes of the melody
for (int thisNote = 0; thisNote < numberOfNotes; thisNote++)
{
    // grab our note and note duration from our array
    int thisNoteTone = melody[thisNote][0];
    int thisNoteDuration = melody[thisNote][1];

    // to calculate the note duration in ms
    int noteDurationMS = 100 / thisNoteDuration;

    // play the note
    tone(speakerPin, thisNoteTone, noteDurationMS);
void Alarm_System()
{
   int analogValue;

    // read the sensor and store it in the variable sensorReading:
    analogValue = analogRead(piezoPin);
    Serial.print ("Loud= ");Serial.println(analogValue);
    // if the sensor reading is greater than the threshold:
    if (analogValue > threshold)
    {
        // send the string "Knock!" back to the computer, followed by newline
        //Serial.println("Knock!");
    for(int i = 0; i<10; i++)
    {
    alarm_sound();
    LightControl(5);
    delay(10);
    }

    }
        digitalWrite(First_Floor_LED, LOW);
        digitalWrite(Second_Floor_LED, LOW);
    // delay to avoid overloading the serial port buffer
    delay(10);
}
void alarm_sound()
{
         // figure out the number of notes in our melody
    int numberOfNotes = sizeof(melody) / sizeof(melody[0]);

    // iterate over the notes of the melody
    for (int thisNote = 0; thisNote < numberOfNotes; thisNote++)
    {
        // grab our note and note duration from our array
        int thisNoteTone = melody[thisNote][0];
        int thisNoteDuration = melody[thisNote][1];

        // to calculate the note duration in ms
        int noteDurationMS = 100 / thisNoteDuration;

        // play the note
        tone(speakerPin, thisNoteTone, noteDurationMS);

        // to distinguish the notes, set a minimum time between them.
        // the note's duration + 30% seems to work well:
        delay(noteDurationMS * 1.30);
    }
}
The Welcome song from the OSEPP source code
int WelcomeSong()
{
    int numberOfNotes = sizeof(melody) / sizeof(melody[0]);
    for (int thisNote = 0; thisNote < numberOfNotes; thisNote++)
    {
        int thisNoteTone = melody[thisNote][0];
        int thisNoteDuration = melody[thisNote][1];
        int noteDurationMS = 1000 / thisNoteDuration;
        // play the note
        tone(speakerPin, thisNoteTone, noteDurationMS);
        delay(noteDurationMS * 1.30);
    }
}
The full code
//Project: Smart House

// include our list of note pitches
#include "pitches.h"

int First_Floor_LED = 3;
int Second_Floor_LED = 5;

// the photocell voltage divider pin
int photocellPin = A0;
int piezoPin = A1;

// the pin the speaker is attached to
int speakerPin = 8;


const int sensorMin = 0;
// sensor maximum, discovered through experiment
const int sensorMax = 800;
const int threshold = 10;

// the notes in our melody and their duration in fractions of a second
// e.g. quarter note = 4, eighth note = 8, etc.
const int melody[][2] =
{
    {NOTE_C4, 4},
    {NOTE_G3, 8},
    {NOTE_G3, 8},
    {NOTE_A3, 4},
    {NOTE_G3, 4},
    {NOTE_BLANK, 4},
    {NOTE_B3, 4},
    {NOTE_C4, 4}
};

void setup()
{
    // set up serial at 9600 baud
    Serial.begin(9600);
    pinMode(First_Floor_LED, OUTPUT);
    pinMode(Second_Floor_LED, OUTPUT);
    WelcomeSong();
}

void loop()
{
  LightSensor();
 Alarm_System();
}

void Alarm_System()
{
   int analogValue;

    // read the sensor and store it in the variable sensorReading:
    analogValue = analogRead(piezoPin);
    Serial.print ("Loud= ");Serial.println(analogValue);
    // if the sensor reading is greater than the threshold:
    if (analogValue > threshold)
    {
        // send the string "Knock!" back to the computer, followed by newline
        //Serial.println("Knock!");
    for(int i = 0; i<10; i++)
    {
    alarm_sound();
    LightControl(5);
    delay(10);
    }

    }
        digitalWrite(First_Floor_LED, LOW);
        digitalWrite(Second_Floor_LED, LOW);
    // delay to avoid overloading the serial port buffer
    delay(10);
}
void alarm_sound()
{
         // figure out the number of notes in our melody
    int numberOfNotes = sizeof(melody) / sizeof(melody[0]);

    // iterate over the notes of the melody
    for (int thisNote = 0; thisNote < numberOfNotes; thisNote++)
    {
        // grab our note and note duration from our array
        int thisNoteTone = melody[thisNote][0];
        int thisNoteDuration = melody[thisNote][1];

        // to calculate the note duration in ms
        int noteDurationMS = 100 / thisNoteDuration;

        // play the note
        tone(speakerPin, thisNoteTone, noteDurationMS);

        // to distinguish the notes, set a minimum time between them.
        // the note's duration + 30% seems to work well:
        delay(noteDurationMS * 1.30);
    }
}

int WelcomeSong()
{
    int numberOfNotes = sizeof(melody) / sizeof(melody[0]);
    for (int thisNote = 0; thisNote < numberOfNotes; thisNote++)
    {
        int thisNoteTone = melody[thisNote][0];
        int thisNoteDuration = melody[thisNote][1];
        int noteDurationMS = 1000 / thisNoteDuration;
        // play the note
        tone(speakerPin, thisNoteTone, noteDurationMS);
        delay(noteDurationMS * 1.30);
    }
}

void LightSensor()
{
      int analogValue;
    int range;

// read our photocell
analogValue = analogRead(photocellPin);
// map the sensor range to a range of four options
range = map(analogValue, sensorMin, sensorMax, 0, 3);

// do something different depending on the
// range value
switch (range)
{
    // Dark turn on the light
    case 0:
        Serial.println("dark");
        LightControl(5);
//        digitalWrite(First_Floor_LED, HIGH);
//        digitalWrite(Second_Floor_LED, HIGH);
        break;
    // Dim turn on the light
    case 1:
        Serial.println("dim");
        LightControl(5);
//        digitalWrite(First_Floor_LED, HIGH);
//        digitalWrite(Second_Floor_LED, HIGH);
        break;
    // Medium turn off the ligh
    case 2:
        Serial.println("medium");
        LightControl(0);
//        digitalWrite(First_Floor_LED, LOW);
//        digitalWrite(Second_Floor_LED, LOW);
        break;
    // Bright Turn off the ligh
    case 3:
        Serial.println("bright");
        LightControl(0);
//        digitalWrite(First_Floor_LED, LOW);
//        digitalWrite(Second_Floor_LED, LOW);
        break;
}

// wait 0.25s before reading the photocell again
delay(25);
}

void LightControl(int LightLevel)
{
  int Light = map(LightLevel,0,5,0,250);

    analogWrite(First_Floor_LED, Light);
    analogWrite(Second_Floor_LED,Light);


}
The video below demonstrates how the active sensor working to detect disturbing noises at night.
Conclusion
The Security System adds another layer to the smart house project. It provides its occupants with comfort yet security by actively listening to the outdoor environment at night. Furthermore, the smart house can then notify the occupants about the disturbance when no one is home. The house of the future is environmentally friendly yet doesn’t sacrifice its occupant’s comfort. In the next chapter, we will learn how a smart house can make an environmentally friendly air conditioning system.